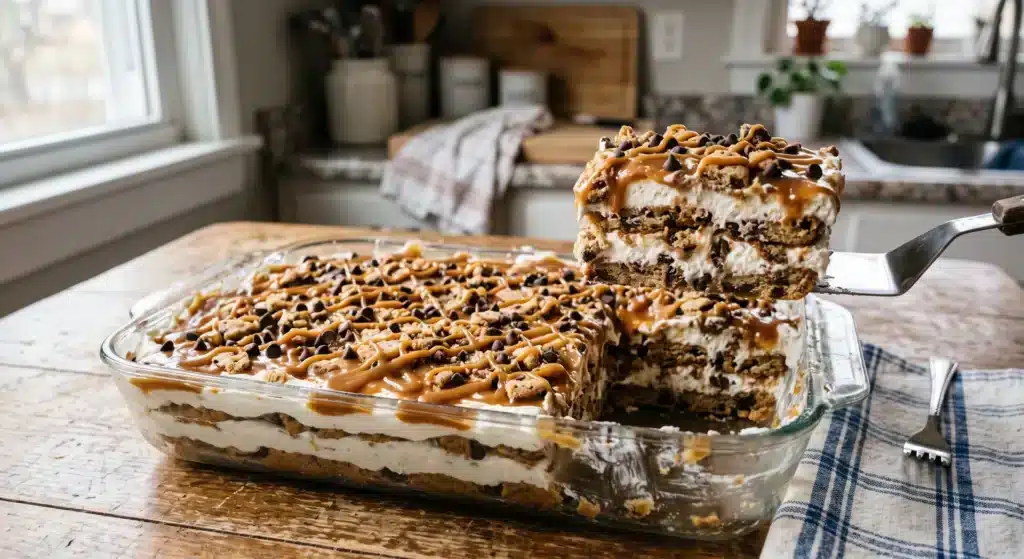
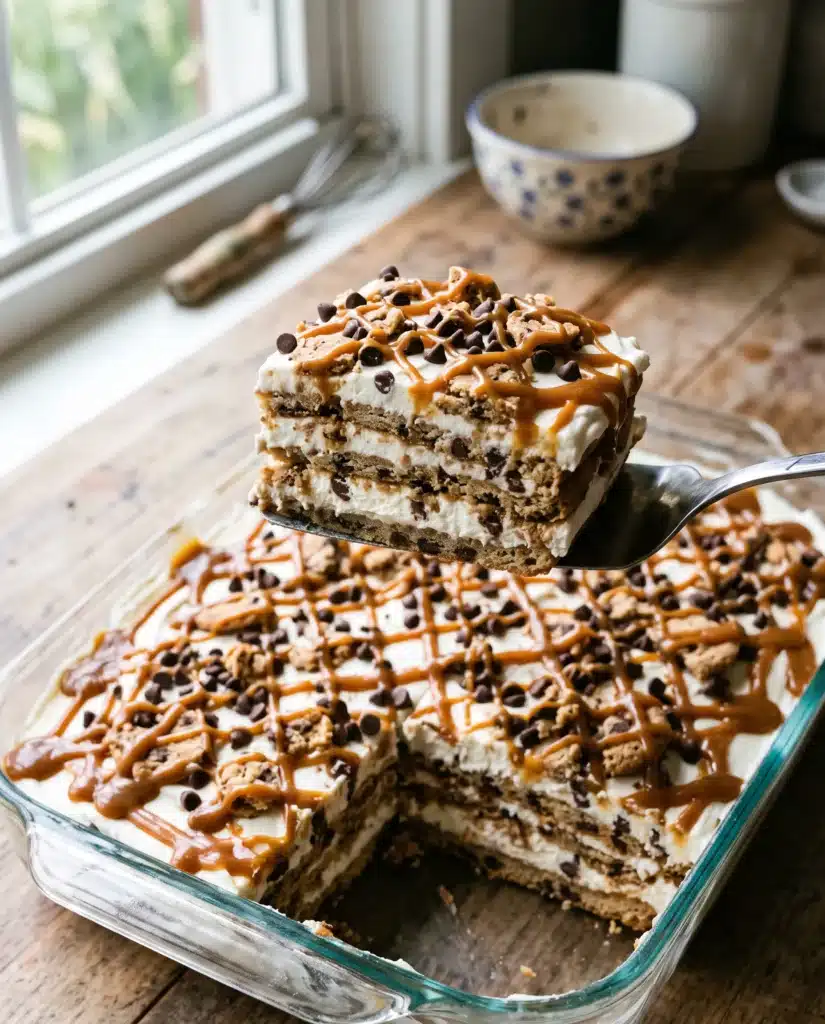
When it comes to creating a memorable and crowd-pleasing treat, this five-ingredient Chips Ahoy icebox cake delivers incredible flavor with minimal effort. It is the ultimate easy, no-bake dessert. An icebox cake is a classic refrigerator dessert that relies on the simple magic of layering crisp cookies with a rich, moisture-heavy cream mixture. As the dessert rests in the refrigerator, the cookies absorb the sweet cream, transforming into a tender, cake-like texture that slices beautifully. This specific version features classic chocolate chip cookies layered in a glass baking dish, coated in a luscious vanilla cream, and topped with a decadent drizzle. It is a fantastic option for warm weather when you want to keep the oven off, or for busy holiday seasons when oven space is at a premium. The creamy, nostalgic flavors blend perfectly, creating a dish that everyone will beg you for.
Why You’ll Love This Recipe
There are countless reasons to add this simple dessert to your regular rotation.
- Simple preparation: This is an easy, no-bake dessert that requires absolutely no oven time or complicated baking techniques.
- Minimal shopping list: As a five-ingredient Chips Ahoy icebox cake, it keeps your grocery shopping remarkably brief and budget-friendly.
- Make-ahead convenience: Icebox cakes not only allow for advance preparation but actually require it, making this the perfect dessert to assemble the day before a big event.
- Customizable layers: While the base recipe is incredibly straightforward, you can easily adapt the layers to suit your personal flavor preferences.
- Kid-friendly construction: Because there is no hot stove or sharp equipment required, this is a wonderful recipe for young helpers who want to whisk the filling and arrange the cookies.
- Guaranteed crowd-pleaser: The combination of soft chocolate chip cookies, creamy vanilla filling, and a rich top drizzle guarantees this is a treat everyone will beg you for.
Ingredients You’ll Need
This straightforward recipe relies on a handful of easy-to-find pantry staples.
For the Main Dish
- 2 packages (13 ounces each) of Chips Ahoy chocolate chip cookies
- 1 box (3.4 ounces) of instant vanilla pudding mix
- 2 cups of cold whole milk
- 1 container (8 ounces) of whipped topping, thawed
For the Topping
- 1/4 cup of caramel sauce
- 1/4 cup of mini chocolate chips (optional garnish to finish the layers)
The instant vanilla pudding mix acts as the primary flavor and structural base for the cream layer. When you whisk the pudding mix with cold milk, it thickens rapidly without any cooking. The thawed whipped topping is then gently folded into the thickened pudding, which lightens the texture and adds a delicate, airy creaminess. The Chips Ahoy cookies provide the essential structure; as they sit in the creamy filling, they soften and mimic the texture of a baked sponge cake. Finally, the caramel sauce is drizzled over the top to add a buttery, rich finish that complements the chocolate and vanilla flavors beautifully.
Ingredient Notes and Substitutions
Adapting this recipe is simple, provided you maintain the correct ratio of moisture to dry ingredients.
- The Cookies: While classic chocolate chip cookies are highly recommended for the best flavor and texture, you can substitute them with graham crackers, chocolate wafer cookies, or even sandwich cookies. Keep in mind that thicker cookies may require an additional hour or two of chilling time to soften completely.
- The Pudding: Instant vanilla pudding offers a sweet, neutral base that lets the chocolate chips shine. However, you can use instant chocolate, caramel, or cheesecake-flavored pudding for a different flavor profile. It is absolutely crucial to use instant pudding mix, not the cook-and-serve variety, as the cook-and-serve type will not set properly with cold milk.
- The Milk: Whole milk provides the richest flavor and best setting capabilities for the instant pudding. If you prefer, 2% milk will work well. Skim milk or plant-based milks like almond or oat milk can result in a thinner, less stable cream layer that may cause the dessert to become runny.
- The Whipped Topping: Store-bought whipped topping provides stability that holds up well in the refrigerator for several days. If you prefer to make homemade whipped cream, whip one and a half cups of heavy whipping cream with a quarter cup of powdered sugar until stiff peaks form, then fold it into the pudding. Note that homemade whipped cream may weep or deflate slightly faster than commercial whipped topping.
Equipment Needed
You only need a few basic kitchen tools to assemble this no-bake treat.
- Large mixing bowl
- Wire whisk
- Silicone spatula
- 9×13-inch glass baking dish
- Measuring cups (if making homemade additions)
How to Make the Recipe
Follow these simple steps to build your layered dessert.
- Prepare the pudding base: In a large mixing bowl, combine the instant vanilla pudding mix and the cold milk. Vigorously whisk the mixture together for about two minutes until the pudding powder is completely dissolved and the liquid begins to thicken slightly.
- Incorporate the whipped topping: Add the thawed whipped topping to the bowl with the thickened pudding. Using a silicone spatula, gently fold the whipped topping into the pudding. Use a sweeping motion, scraping the bottom and sides of the bowl, until the mixture is uniform in color and no white streaks remain. Avoid stirring aggressively, which can deflate the airy texture.
- Build the first cookie layer: Arrange a single, even layer of Chips Ahoy cookies across the bottom of a 9×13-inch glass baking dish. Place them as close together as possible. If necessary, break a few cookies into smaller pieces to fill in any large gaps around the edges of the dish.
- Add the first cream layer: Scoop half of the prepared pudding and whipped topping mixture onto the cookies. Use your spatula to spread the cream evenly all the way to the corners of the dish. Ensure the cookies are fully covered, as this direct contact with the cream is what allows them to soften.
- Repeat the layers: Add a second, even layer of chocolate chip cookies over the cream. Follow this with the remaining half of the cream mixture, smoothing the top surface perfectly flat.
- Garnish the dessert: Take your caramel sauce and drizzle it generously over the top layer of cream in a crosshatch or zigzag pattern. If desired, sprinkle a handful of chocolate chips or crushed cookie pieces over the caramel.
- Chill thoroughly: Cover the glass dish tightly with plastic wrap or a fitted lid. Place the dish in the refrigerator for at least 8 hours, or ideally overnight. This extended resting time is non-negotiable, as it is the only way the cookies will transform into a soft, sliceable cake texture.
Tips for the Best Results
Achieving the perfect texture requires a little bit of patience and attention to detail.
- Thaw the whipped topping completely: Ensure your whipped topping is fully thawed in the refrigerator before you begin. Attempting to fold frozen or partially frozen topping into the pudding will create a lumpy cream layer that will not spread evenly.
- Use cold milk: Instant pudding relies on a chemical reaction with cold milk to set properly. Room temperature or warm milk will delay the thickening process and may result in a soupy dessert.
- Do not skimp on resting time: The most crucial element of an icebox cake is the time it spends in the refrigerator. If you cut into the dessert after only two or three hours, the cookies will still be crunchy, and the dessert will fall apart on the plate.
- Create even layers: Take your time spreading the cream mixture perfectly flat over each layer of cookies. Even layers ensure that every single cookie receives enough moisture to soften, preventing hard, dry bites in your finished slices.
- Wipe your knife between slices: When you are ready to serve the dessert, use a sharp knife and wipe the blade clean with a damp paper towel between every single cut. This prevents the chocolate and caramel from dragging through the stark white vanilla cream, keeping your presentation neat and appetizing.
Common Mistakes to Avoid
While this recipe is straightforward, a few missteps can compromise the final dish.
- Using cook-and-serve pudding: Grabbing the wrong box of pudding mix is the most common error. Cook-and-serve pudding requires heat to activate the starches. If mixed with cold milk, it will remain a gritty, watery liquid. Always double-check the box for the word “instant.”
- Overmixing the cream: When combining the pudding and the whipped topping, it is vital to fold gently. Whisking or beating these two ingredients together aggressively will knock the trapped air out of the whipped topping, resulting in a dense, heavy, and potentially runny filling.
- Leaving large gaps between cookies: When building your base and middle layers, try to cover as much surface area as possible. If there are massive gaps between the cookies, your dessert will lack structural integrity and will slump when sliced.
- Skipping the cover during chilling: Refrigerators circulate dry air to keep food cold. If you leave the dessert uncovered while it chills, the top layer of cream will dry out, crack, and absorb savory odors from other foods in your fridge. Always use plastic wrap or a secure lid.
Serving Suggestions
Because this dessert is exceptionally rich, sweet, and creamy, it pairs best with accompaniments that provide a slight contrast.
Serve chilled squares of this cake alongside a hot cup of dark roast coffee or a shot of unsweetened espresso. The bitterness of the coffee beautifully balances the sweet vanilla and caramel notes. If you are serving this at a summer barbecue or family picnic, offer it with tall glasses of ice-cold milk or a tart, unsweetened iced tea. Fresh berries, such as strawberries or raspberries, also make an excellent side, as their natural acidity cuts through the richness of the pudding and whipped topping.
Storage and Reheating
Proper storage preserves the delicate texture and prevents the dessert from becoming overly soggy.
- Refrigerating: Keep any leftover cake in the original glass baking dish. Cover it tightly with plastic wrap, ensuring the wrap does not touch the caramel topping, or use an airtight lid. It will stay fresh in the refrigerator for up to three days. After the third day, the cookies may become excessively mushy.
- Freezing: You can freeze this dessert for a different textural experience. Wrap the dish tightly in a layer of plastic wrap followed by a layer of aluminum foil. Freeze for up to one month.
- Thawing: If you froze the dessert, you can serve it partially frozen, like a traditional ice cream cake, which is highly refreshing. Alternatively, let it thaw in the refrigerator for four to six hours before serving to return it to its classic soft state.
- Reheating: Under no circumstances should this dessert be heated, microwaved, or baked. It is designed to be eaten cold straight from the refrigerator or freezer.
Frequently Asked Questions
Can I make this recipe ahead of time?
Yes, this dessert actually requires advance preparation. It is best made 12 to 24 hours before you plan to serve it, allowing ample time for the chocolate chip cookies to soften in the cream mixture.
Why did my cream mixture turn out runny?
A runny cream layer usually happens for one of three reasons: using cook-and-serve pudding instead of instant, using a milk alternative with too high a water content (like skim or almond milk), or failing to whisk the pudding and milk long enough before folding in the whipped topping.
Can I dip the cookies in milk first to speed up the softening process?
It is not recommended to dip the cookies in milk before layering them. The pudding and whipped topping mixture contains the perfect amount of moisture to soften the cookies over an 8-hour period. Dipping them in extra liquid will cause the dessert to become watery and excessively soggy.
Can I double the recipe?
You can easily double the ingredients, but you will need to use a larger dish or build two separate 9×13-inch baking dishes. Do not try to stack four or five layers in a single standard dish, as the dessert will become too heavy and unstable to slice neatly.
Is it possible to use homemade chocolate chip cookies?
You can use homemade cookies, provided they are baked to a very crisp, crunchy texture. Soft-baked homemade cookies will break down too quickly in the cream and turn into mush. Store-bought crispy cookies generally yield the most consistent and reliable results.
Final Thoughts
Creating a stunning, crowd-pleasing dessert does not have to involve hours of complicated baking or a sink full of dirty dishes. By relying on simple pantry staples and the magic of refrigerator chilling, you can assemble a masterpiece in mere minutes. The rich layers of softened cookies and airy vanilla cream make this Chips Ahoy icebox cake a reliable favorite for any occasion. Give this effortless recipe a try for your next gathering, and enjoy the praise that comes with serving a perfectly sweet, nostalgic treat.