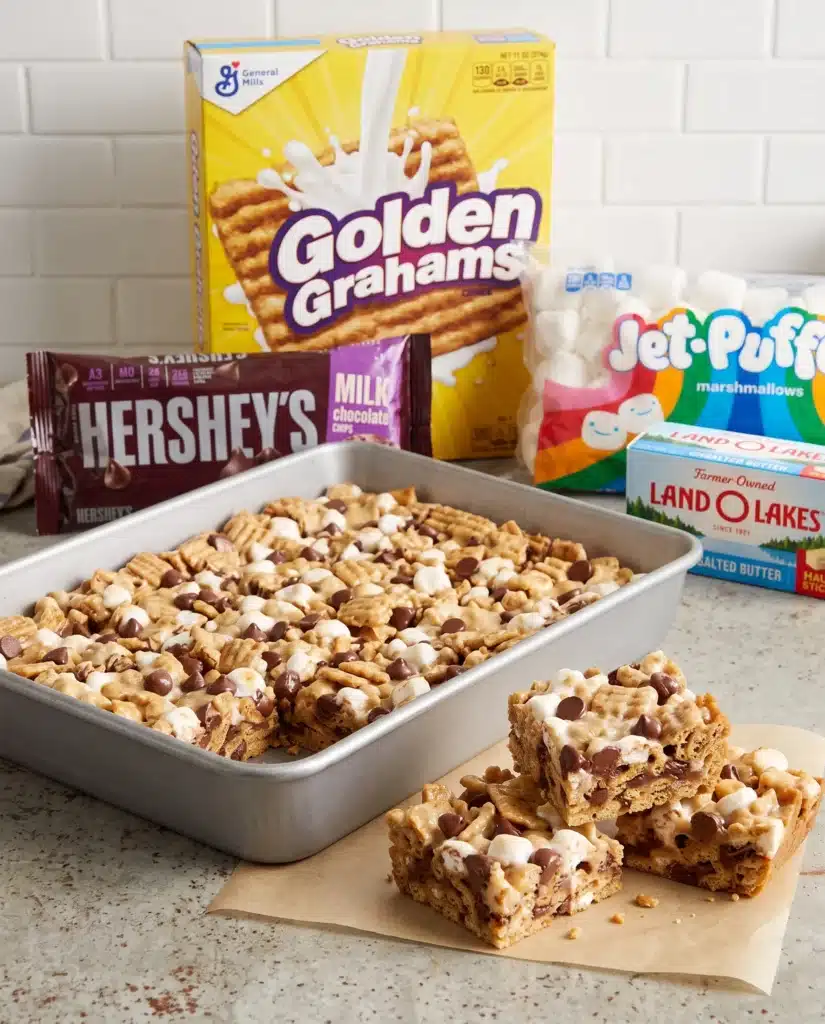
Imagine the classic, campfire-toasted flavor of a s’more, transformed into a thick, chewy, and highly portable treat. These easy no-bake cereal bars combine the honey-sweet crunch of graham cracker squares with rich semi-sweet chocolate chips, all bound together by a gooey, buttery marshmallow pull. The result is a beautifully textured dessert that delivers the nostalgic taste of summer nights without the need for an open fire or sticky fingers.
The contrast in textures is what makes this dessert truly memorable. You get a satisfying crunch from the cereal, a rich melt-in-your-mouth creaminess from the chocolate chips, and a soft, pillowy chew from the melted marshmallow mixture. Because these bars require absolutely no baking, they are the ideal solution for a quick weekend dessert, a last-minute potluck contribution, or a fun afternoon activity for the family. They set up beautifully at room temperature, making them easy to slice, pack, and serve. Whether you are hosting a summer barbecue, packing lunchboxes, or simply craving a sweet late-night snack, this practical and crowd-pleasing recipe delivers maximum flavor with minimal effort.
Why You’ll Love This Recipe
- No Oven Required: The entire cooking process happens on the stovetop in just a few minutes, keeping your kitchen cool and clean.
- Accessible Ingredients: You only need four basic pantry staples to create the base of this dessert, saving you a trip to a specialty grocery store.
- Incredible Texture: The combination of crispy cereal, soft marshmallow, and firm chocolate chips provides a perfectly balanced bite every single time.
- Travel-Friendly: Unlike traditional s’mores that melt and create a mess, these bars hold their shape beautifully, making them perfect for picnics, bake sales, and road trips.
- Fast Preparation: With only about ten minutes of active preparation time, you can have a full batch ready to set before you even finish cleaning the pot.
- Highly Customizable: You can easily swap out the type of chocolate, add a pinch of sea salt, or mix in extra toppings to suit your exact flavor preferences.
Ingredients You’ll Need
For the Main Dish
- 1/2 cup unsalted butter
- 1 (10-ounce) package large marshmallows
- 6 cups graham cracker cereal
- 1 cup semi-sweet chocolate chips
For the Topping (Optional)
- 1/2 cup mini marshmallows
- 1/4 cup semi-sweet chocolate chips
Unsalted butter provides a rich, savory backbone that cuts through the intense sweetness of the candy and cereal. Large marshmallows act as the primary binding agent; when melted slowly with the butter, they create a sticky, elastic sauce that holds the bars together. The graham cracker cereal replaces traditional graham crackers, offering an airy crunch and deep honey flavor that won’t turn soggy. Finally, semi-sweet chocolate chips introduce pockets of rich, dark cocoa flavor that balance the sugary marshmallow coating perfectly.
Ingredient Notes and Substitutions
If you only have salted butter on hand, you can easily use it in place of the unsalted butter. The added salt actually enhances the flavors and helps balance the overall sweetness of the treat. If you use unsalted butter, consider adding a small pinch of kosher salt to the melting marshmallows.
For the cereal, any brand of square graham cracker cereal will work perfectly. If you want to change the flavor profile, you can substitute a cinnamon-sugar cereal square, which will give the final dish a warm, spiced undertone. Just keep the volume to exactly six cups to ensure the marshmallow-to-cereal ratio remains accurate.
The semi-sweet chocolate chips can be swapped out for milk chocolate chips if you prefer a sweeter, more traditional s’mores flavor. Dark chocolate chunks are an excellent choice for a more mature, robust flavor profile. If you choose to use chocolate chunks, be aware that they may take slightly longer to set up when cooling.
While the recipe calls for large marshmallows for melting, you can substitute them with an equal weight (10 ounces) of mini marshmallows. Mini marshmallows actually melt faster and more evenly, though the large ones work just as beautifully if you are patient with the heat.
Equipment Needed
- 9×9-inch square baking pan
- Parchment paper
- Large heavy-bottomed pot or Dutch oven
- Silicone spatula or wooden spoon
- Measuring cups
How to Make the Recipe
- Prepare the baking pan. Line a 9×9-inch baking pan with parchment paper, leaving a slight overhang on two sides. This overhang acts as a sling, allowing you to lift the entire block of bars out of the pan later. Lightly grease the parchment paper with non-stick cooking spray or a thin coat of butter to prevent sticking.
- Melt the butter and marshmallows. Place a large heavy-bottomed pot over low heat and add the unsalted butter. Once the butter is mostly melted, add the large marshmallows. Stir continuously with a silicone spatula or wooden spoon. The mixture is ready when it is completely smooth, velvety, and no lumps of marshmallow remain. Do not rush this step; using high heat will scorch the butter and cause the sugar in the marshmallows to harden, resulting in tough bars.
- Incorporate the cereal. Remove the pot entirely from the heat source. Immediately pour in the graham cracker cereal. Gently fold the mixture together using your spatula, scraping the bottom of the pot to ensure every single piece of cereal is evenly coated in the warm marshmallow mixture.
- Cool slightly, then add chocolate. Let the coated cereal mixture sit in the pot for about two minutes. If you add the chocolate chips while the marshmallow is boiling hot, they will melt completely and turn the entire mixture brown. Once slightly cooled but still sticky, gently fold in the one cup of semi-sweet chocolate chips just until they are distributed throughout the cereal.
- Transfer and press into the pan. Pour the sticky mixture into your prepared baking pan. Lightly coat your fingertips with butter, or lightly spray a piece of wax paper with non-stick spray, and gently press the mixture into an even layer. Stop pressing as soon as the top is flat. Pressing too firmly will crush the cereal and compress the marshmallows, leading to dense, hard bars.
- Add the toppings and let set. If using the optional toppings, immediately scatter the mini marshmallows and extra chocolate chips over the warm surface, pressing them down very lightly so they adhere. Allow the pan to sit at room temperature for at least one hour, or until the bars are completely cool and firm to the touch.
- Slice and serve. Use the parchment paper overhang to lift the block out of the pan and onto a cutting board. Use a large, sharp knife to cut the block into nine even squares.
Tips for the Best Results
- Keep the heat low: Patience is the secret to a soft, chewy texture. Melting the butter and marshmallows over low heat prevents the sugars from crystallizing. Rushing this process on medium or high heat will almost always guarantee a rock-hard dessert.
- Use fresh marshmallows: Stale marshmallows lose their moisture and do not melt smoothly. Always open a fresh bag for no-bake treats to ensure a glossy, elastic bind.
- Butter your tools: Marshmallow is notoriously sticky. Lightly buttering your silicone spatula and your hands will make folding and pressing the mixture significantly easier and less frustrating.
- Do not crush the cereal: When stirring the cereal into the pot, use a gentle folding motion. Scraping from the bottom and pulling up over the top helps keep the delicate graham squares completely intact.
- Leave room for air: When pressing the mixture into your baking pan, use the absolute lightest touch possible. You want the bars to hold together, but leaving small air pockets ensures they remain easy to bite into.
- Warm your knife: For bakery-style, clean edges, run your large chef’s knife under hot water, wipe it completely dry with a towel, and then slice into the set bars. The residual heat will glide through the marshmallows and chocolate chips perfectly.
Common Mistakes to Avoid
Melting the Chocolate Completely
If you fold the chocolate chips into the pot straight off the stove, the residual heat will melt them instantly. Instead of distinct chocolate chips and graham cereal, you will end up with a muddy, brown, chocolate-marshmallow paste. Waiting just two minutes allows the mixture to cool enough to keep the chips intact while remaining sticky enough to hold them.
Pressing the Mixture Too Hard
It is incredibly tempting to pack the mixture down tightly into the pan to make it look neat. Doing so compresses all the air out of the marshmallows and crushes the cereal. When the bars cool, they will be unpleasantly dense and difficult to chew. Always use a gentle, sweeping motion just to level the top.
Using an Unlined Pan
Skipping the parchment paper is a recipe for disaster. Cooled marshmallow bonds strongly to metal and glass baking pans. Even with cooking spray, you will likely have to dig the bars out with a metal spatula, ruining their square shape. The parchment sling guarantees a flawless removal every time.
Serving or Slicing Too Early
If you try to cut the bars while they are still warm, the marshmallow will stretch and stick to the knife, and the bars will fall apart. Allowing them a full hour at room temperature ensures the chocolate firms up and the marshmallow sets into a clean, sliceable consistency.
Serving Suggestions
These sweet, rich bars are perfectly capable of standing on their own as a standalone dessert or afternoon snack. They are best served alongside a tall, cold glass of milk, which helps balance the intense sweetness of the marshmallows and chocolate. If serving to adults, a hot cup of black coffee or an unsweetened iced latte makes an excellent pairing, as the bitterness of the coffee beautifully cuts through the sugar.
For a larger gathering or a summer party, try arranging the cut squares on a rustic wooden platter alongside fresh strawberries, raspberries, and pretzel sticks. The fresh fruit provides a bright, acidic contrast, while the pretzels offer a salty bite. Because they hold up well in warm weather, these bars are the ultimate addition to a picnic basket, a camping trip cooler, or a backyard barbecue dessert table.
Storage and Reheating
Cooling and Refrigerating
It is important to let the bars cool completely at room temperature. Do not put them in the refrigerator to speed up the cooling process, as the cold air will harden the butter and marshmallows, making the bars incredibly stiff.
Choosing a Storage Container
Once sliced, store the bars in an airtight container at room temperature. Place a sheet of parchment paper or wax paper between layers to prevent the squares from sticking to one another. When stored properly in a dark, cool pantry or on the counter away from direct sunlight, they will remain soft, fresh, and chewy for up to four days.
Freezing and Thawing
These bars freeze surprisingly well if you want to extend their shelf life. Wrap each individual square tightly in plastic wrap, then place all the wrapped squares into a heavy-duty, freezer-safe zip-top bag. Squeeze out as much air as possible. They can be frozen for up to two months.
To thaw, remove the desired number of bars from the freezer and let them sit on the counter at room temperature for about 30 to 45 minutes. Do not thaw them in the microwave, as the chocolate will melt and the marshmallow will become dangerously hot and liquid.
Reheating
These bars are intended to be eaten at room temperature and do not require reheating. However, if you prefer a slightly warmer, gooey texture reminiscent of a fresh s’more, you can place a single bar on a microwave-safe plate and heat it on 50% power for exactly 5 to 8 seconds. Watch carefully, as marshmallow expands rapidly when heated.
Frequently Asked Questions
Can I make this recipe ahead of time?
Yes, these bars are an excellent make-ahead dessert. Since they need at least an hour to set, making them the night before or the morning of your event is highly recommended. Just be sure to cover the pan tightly with plastic wrap or transfer the cut squares to an airtight container so they don’t dry out overnight.
Can I use a different cooking method to melt the marshmallows?
While the stovetop method provides the most control, you can use a microwave. Place the butter and marshmallows in a large microwave-safe bowl. Heat on high in 30-second bursts, stirring well after each interval, until the mixture is completely smooth. Be extremely careful, as the bowl will get hot and marshmallows expand significantly in the microwave.
How do I know when the marshmallow mixture is fully cooked?
The mixture isn’t technically “cooking” so much as it is melting. You will know it is ready the moment the butter is fully incorporated into the marshmallows, and the liquid is entirely smooth and glossy with absolutely no solid white lumps remaining. Remove it from the heat the exact second it reaches this stage.
Why did my recipe turn out dry and hard?
The most common culprit for hard bars is overcooking the marshmallow mixture. Using high heat or leaving the pot on the stove too long causes the sugars to crystallize. Another reason could be using expired, stale marshmallows that have lost their internal moisture, or aggressively packing the mixture down into the pan.
Can I double the recipe?
Yes, you can easily double the ingredients. If you do, you will need a very large pot or Dutch oven to accommodate the volume, as well as a 9×13-inch baking pan to press the mixture into. The setting time will remain the same.
Can I replace one of the main ingredients?
The core components (butter and marshmallows) are required for the structure, but the mix-ins are flexible. You can swap the graham cereal for an equal amount of crispy rice cereal or corn flakes, though you will lose the signature s’mores flavor. You can also replace the chocolate chips with peanut butter chips or butterscotch chips for a completely different flavor profile.
Final Thoughts
Creating bakery-quality treats at home doesn’t always require turning on the oven or spending hours in the kitchen measuring flour and sugar. By relying on a few simple techniques—like keeping the heat low and being gentle when mixing—you can achieve the perfect balance of gooey and crunchy textures. Give this simple stovetop method a try the next time you need a quick, reliable dessert. These s’mores cereal bars are sure to become a highly requested favorite for your family and friends.