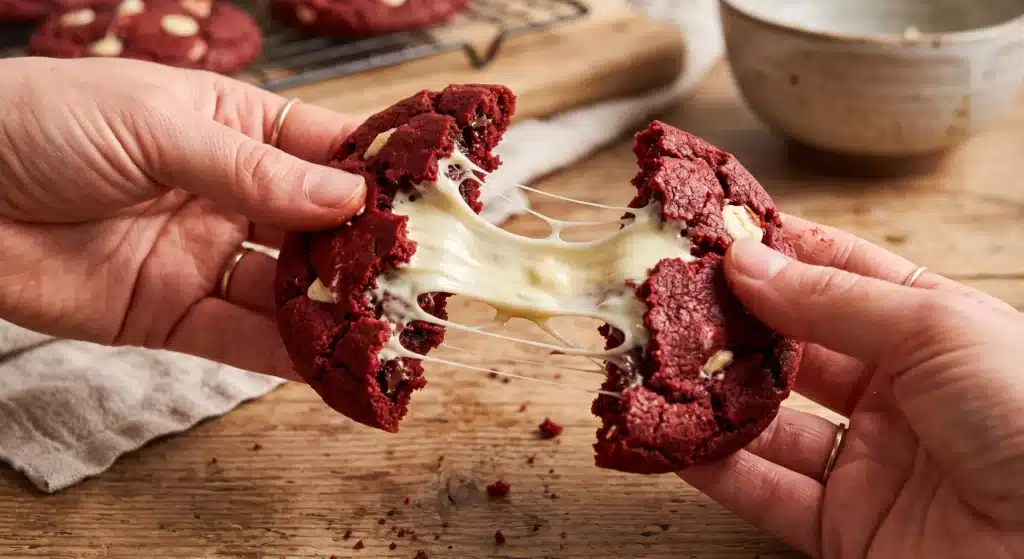
Soft, vividly red cookies with a subtle cocoa flavor, packed densely with creamy white chocolate chips. The contrast between the striking crimson dough and the pale white chocolate creates a visually appealing treat that tastes just as rich as it looks. These 4-ingredient red velvet cookies offer the classic flavor profile of a traditional red velvet cake but in a portable, chewy format that requires a fraction of the standard effort. By utilizing a boxed cake mix as the foundational ingredient, this method streamlines the entire baking process, eliminating the need to measure out flour, baking soda, cocoa powder, salt, and granulated sugar.
You can serve them for holiday gatherings, school bake sales, Valentine’s Day events, or a casual weekend dessert. The texture remains exceptionally soft in the center, while the edges develop a slight crispness in the oven. Because the preparation takes only a few minutes and relies primarily on standard pantry staples, this is a highly practical option when you need a freshly baked dessert without spending hours in the kitchen gathering supplies and measuring dry ingredients.
Why You’ll Love This Recipe
- Simple preparation: The entire dough comes together in a single mixing bowl, which significantly reduces the time you spend washing dishes and cleaning your kitchen workspace.
- Accessible ingredients: With only four components required, you can easily find everything you need in the baking aisle of any standard grocery store.
- Quick cooking: The dough requires no mandatory chilling time, meaning you can move directly from mixing to baking. The cookies spend less than fifteen minutes in the oven.
- Appealing flavor and texture: The combination of vegetable oil and eggs creates a dense, soft-baked center that closely mimics the texture of a brownie, while the white chocolate adds bursts of creamy sweetness.
- Customizable ingredients: The straightforward base dough serves as a blank canvas, allowing you to easily swap the white chocolate for other mix-ins depending on what you have available in your pantry.
Ingredients You’ll Need
For the Cookies
- 1 box (15.25 ounces) red velvet cake mix
- 2 large eggs
- 1/2 cup vegetable oil
- 1 cup white chocolate chips
The red velvet cake mix serves as the dry foundation for the dough, providing the flour, sugar, cocoa powder, and signature red coloring all in one package. Using this pre-mixed base is what makes the recipe so fast and reliable. The large eggs act as the primary binding agent, giving the dough structure so the cookies hold their shape while baking. Vegetable oil is crucial for moisture; it ensures the baked goods remain soft and chewy for days rather than turning dry or crumbly. Finally, the white chocolate chips cut through the subtle cocoa notes of the red velvet, offering a creamy, sweet contrast in every bite.
Ingredient Notes and Substitutions
If you do not have vegetable oil on hand, canola oil or grapeseed oil will work equally well without altering the flavor profile. You can also substitute an equal amount of melted unsalted butter for the oil. Using melted butter will yield a slightly firmer edge and a richer, more traditional buttery flavor, though the cookies may spread slightly less in the oven.
When it comes to the mix-ins, white chocolate chips provide the classic visual and flavor pairing for red velvet. However, you can easily substitute them with semi-sweet chocolate chips, dark chocolate chunks, or even cream cheese flavored baking chips. If you want a textural contrast, replacing half of the chocolate chips with chopped pecans or walnuts will introduce a pleasant crunch.
Ensure your eggs are at room temperature before you begin mixing. Cold eggs can cause the fat in the oil or melted butter to seize up, resulting in a dense and uneven dough.
Equipment Needed
- Large mixing bowl
- Sturdy wooden spoon or silicone spatula
- Medium cookie scoop (approximately 1.5 tablespoons capacity)
- Large baking sheet
- Parchment paper or a silicone baking mat
- Wire cooling rack
How to Make the Recipe
- Preheat the oven and prepare your pan. Set your oven temperature to 350°F (175°C). Line a large baking sheet with a piece of parchment paper or a silicone baking mat. This step prevents the dough from sticking to the metal and encourages even browning on the bottom of the cookies.
- Combine the base ingredients. In your large mixing bowl, pour in the dry red velvet cake mix, the two large eggs, and the half cup of vegetable oil. Use a sturdy wooden spoon or a strong silicone spatula to mix the ingredients together.
- Mix until a thick dough forms. Continue stirring the mixture until no dry, powdery pockets of cake mix remain at the bottom of the bowl. The resulting dough will be exceptionally thick, heavy, and slightly sticky. This heavy texture is completely normal and necessary for a chewy final product.
- Fold in the chocolate chips. Pour the white chocolate chips into the mixing bowl. Gently fold them into the heavy dough, ensuring they are distributed evenly throughout. Take care not to overmix the dough at this stage, as excessive stirring can lead to a tough texture.
- Scoop the dough. Use a medium cookie scoop to portion the dough into uniform balls, each about one and a half tablespoons in size. Dropping uniform mounds ensures that all the cookies bake at the exact same rate.
- Arrange on the baking sheet. Place the scooped dough balls onto your prepared baking sheet. Leave approximately two inches of empty space between each ball, as the dough will spread and flatten as it bakes in the hot oven.
- Bake the cookies. Place the baking sheet on the center rack of your preheated oven. Bake for 9 to 11 minutes. Watch the cookies closely during the final two minutes. You will know they are ready when the edges look dry and set, even if the very center still appears slightly soft or underbaked.
- Rest and cool completely. Remove the baking sheet from the oven. Leave the cookies on the hot pan for exactly five minutes. The residual heat from the pan will gently finish cooking the centers without drying them out. After five minutes, use a spatula to carefully transfer each cookie to a wire cooling rack to cool completely.
Tips for the Best Results
- Use room temperature eggs: Pull your eggs from the refrigerator about thirty minutes before you plan to bake. Room temperature eggs blend much more smoothly into the heavy cake mix, preventing you from overworking the dough.
- Reserve chips for presentation: Hold back about a quarter cup of the white chocolate chips when mixing the dough. Once you scoop the dough balls onto the baking sheet, press a few of the reserved chips gently into the top of each mound. This ensures a bakery-style appearance with the chips clearly visible on the surface after baking.
- Do not overbake: The most crucial tip for a chewy texture is to remove the pan from the oven while the centers still look slightly soft. They will continue to firm up as they rest on the warm baking sheet. Baking them until they look completely solid in the oven will result in a dry, crunchy texture.
- Chill sticky dough: Depending on the brand of cake mix and the ambient humidity in your kitchen, the dough might feel too sticky to scoop cleanly. If this happens, cover the bowl and place it in the refrigerator for fifteen to twenty minutes. Chilling firms up the fat, making the dough much easier to handle and scoop.
- Measure oil accurately: Use a liquid measuring cup to measure the half cup of vegetable oil. Pouring the oil while viewing the cup at eye level ensures accuracy. Too much oil will cause the cookies to spread into thin, greasy puddles, while too little will make the dough crumbly.
- Use a heavy-duty mixing tool: Because this dough is incredibly thick and lacks the standard amount of liquid found in typical cake batters, a flimsy wire whisk will quickly bend or break. Always use a thick wooden spoon or a firm silicone spatula to bring the mixture together.
Common Mistakes to Avoid
- Crowding the baking sheet: If you place the dough balls too close together, they will merge into one giant sheet as they spread in the oven. Always leave at least two inches of space around each scoop to allow for proper air circulation and spreading.
- Skipping the resting time: Moving the baked goods from the hot pan to the cooling rack immediately after taking them out of the oven will cause them to break apart. The five-minute resting period on the pan is essential for the structure to solidify.
- Using an expired cake mix: Boxed mixes contain baking powder and baking soda, which lose their rising power over time. Using an expired mix will result in flat, dense disks that fail to puff up in the oven. Always check the expiration date on the box before starting.
- Adding additional liquid: The dough will initially look dry and crumbly when you first begin stirring. A common mistake is assuming you need to add water or milk. Keep stirring with a heavy spoon; the wet ingredients will eventually hydrate all the dry mix to form a cohesive, thick dough.
Serving Suggestions
These robust, cocoa-flavored treats pair beautifully with a tall glass of cold milk or a hot cup of black coffee, which helps balance the sweetness of the white chocolate. For an elevated dessert presentation, serve them warm alongside a generous scoop of vanilla bean ice cream.
Because of their striking crimson color, they make an excellent addition to a Valentine’s Day dessert platter, a Christmas cookie exchange, or a festive Fourth of July spread. If you are packing them for a bake sale or a picnic, consider wrapping them individually in clear cellophane bags tied with a decorative ribbon for a polished, professional look.
Storage and Reheating
Cooling the food: Always allow the cookies to cool completely to room temperature on a wire rack before attempting to store them. Placing warm baked goods into a container traps steam, which leads to soggy edges and an unappealing texture.
Refrigerating leftovers: While you can store them in the refrigerator, it is generally better to keep them at room temperature to preserve their soft texture. If you must refrigerate them, place them in an airtight container for up to one week. Bring them back to room temperature before serving.
Choosing a storage container: Store the completely cooled cookies in an airtight plastic or glass container at room temperature for up to four days. To keep them extra soft, you can place a small piece of plain white bread inside the container; the baked goods will absorb the moisture from the bread.
Freezing the baked cookies: These freeze exceptionally well. Place the fully cooled cookies in a single layer inside a freezer-safe zip-top bag or an airtight container. Separate multiple layers with sheets of parchment paper to prevent sticking. They will maintain their quality in the freezer for up to three months.
Freezing the dough: You can also freeze unbaked dough balls. Scoop the dough onto a baking sheet and freeze until solid. Transfer the frozen dough balls to a freezer bag. When you are ready to bake, you can place the frozen dough directly onto a prepared baking sheet, adding one to two extra minutes to the baking time.
Thawing and Reheating: To thaw baked cookies, leave them on the kitchen counter at room temperature for about an hour. If you want to replicate that freshly-baked, gooey texture, place a single cookie on a microwave-safe plate and heat it for five to eight seconds just before eating.
Frequently Asked Questions
Can I make this recipe ahead of time?
Yes, you can prepare the dough up to two days in advance. Cover the mixing bowl tightly with plastic wrap and store it in the refrigerator. When you are ready to bake, let the bowl sit on the counter for about twenty minutes to soften slightly, making it easier to scoop.
Can I replace one of the main ingredients?
While the cake mix and eggs are essential for the structure, the oil can be substituted with melted butter. The white chocolate chips can be replaced with any flavor of baking chip, chopped nuts, or even dried fruit, as long as the total volume remains at one cup.
How do I know when it is fully cooked?
The most reliable visual cue is the condition of the edges. The edges should appear matte, dry, and firmly set. The center will still look somewhat glossy and soft. Because they continue to bake on the hot pan after leaving the oven, pulling them out when the centers look slightly underdone guarantees a soft texture.
Why did my recipe turn out dry, soggy, dense, or runny?
If the final result is dry and crumbly, you likely overmeasured the dry ingredients by adding extra flour, or you left the pan in the oven for too long. If they spread into runny puddles, you may have used too much oil or baked them on a baking sheet that was still hot from a previous batch. A dense texture often occurs if the cake mix is expired or if the dough was severely overmixed.
Can I double the recipe?
Yes, you can easily double the ingredients to produce a larger batch. Simply use two boxes of red velvet cake mix, four large eggs, one cup of vegetable oil, and two cups of white chocolate chips. Ensure you use an extra-large mixing bowl, as the doubled dough requires significant effort to mix properly.
Can I use a different cooking method?
This dough is formulated specifically for a conventional oven. While some bakers experiment with air fryers for small batches, the intense, circulating heat of an air fryer can cause the outsides to burn before the thick centers finish cooking. For the most consistent and reliable outcome, stick to the standard oven method.
What should I serve with it?
Beyond standard milk and coffee, these pair well with a cream cheese fruit dip, a side of fresh strawberries, or a warm mug of hot chocolate. The subtle cocoa notes make them highly versatile for pairing with various sweet beverages.
Final Thoughts
Baking a satisfying dessert does not require a long list of ingredients or hours of preparation. By keeping a simple boxed mix in your pantry, you can create a memorable treat at a moment’s notice. Gather your basic supplies, mix up the thick dough, and enjoy a warm batch of 4-ingredient red velvet cookies straight from your oven.