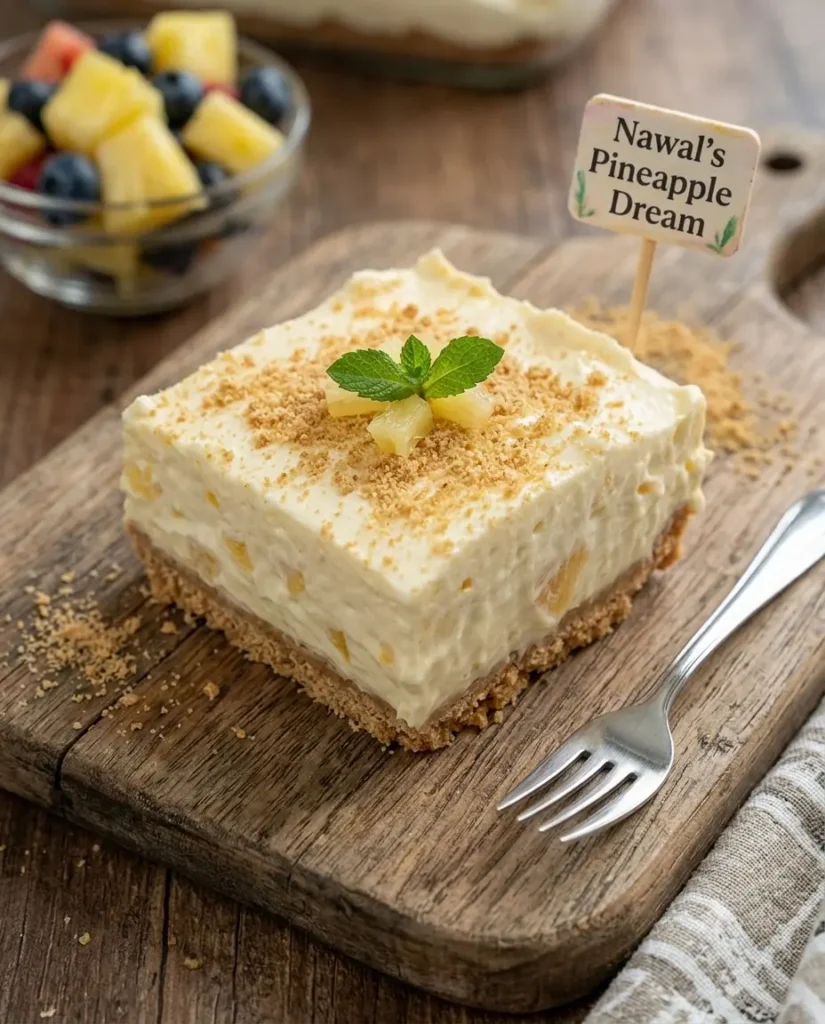
When the weather turns warm, standing over a hot stove or waiting for an oven to preheat is the last thing anyone wants to do. That is exactly when a refreshing, layered treat becomes an ideal solution. This no-bake pineapple dream dessert is a lush, tropical-inspired creation that balances a buttery, crisp base with a cloud-like, fruity filling. The foundation is a classic graham cracker crust, providing just the right amount of savory crunch to contrast with the sweet layers above.
On top of that rests a thick, creamy filling made from rich cream cheese, sweet powdered sugar, and vibrant crushed pineapple. The entire mixture is lightened with whipped topping, creating a fluffy texture that practically melts in your mouth. The flavors balance each other beautifully, pairing the savory richness of the cream cheese and butter with the acidic brightness of the pineapple. Whether you are hosting a summer barbecue, attending a neighborhood potluck, or simply craving a cool and creamy sweet treat after dinner, this dish delivers. It requires minimal active preparation time and relies on a long chill in the refrigerator to set up, leaving you free to focus on other tasks while dessert makes itself.
Why You Will Love This Recipe
- No Oven Required: The entire preparation takes place on the countertop, keeping your kitchen cool and minimizing cleanup.
- Make-Ahead Convenience: Because this dessert requires several hours to chill and set, it is an excellent option to prepare the day before an event, removing any last-minute stress.
- Simple Ingredients: The ingredient list relies on accessible, everyday pantry and refrigerator staples that are easy to find in any grocery store.
- Appealing Texture Contrast: The combination of a firmly packed, crunchy graham cracker crust and an incredibly light, airy cream cheese filling provides a satisfying texture in every single bite.
- Customizable Base: While the pineapple filling is the star, the simple structure of the dessert allows you to easily swap the graham crackers for other crushed cookies to suit your preferences.
Ingredients You’ll Need
For the Graham Cracker Crust
- 2 cups graham cracker crumbs
- 1/2 cup unsalted butter, melted
- 1/4 cup granulated sugar
For the Pineapple Cream Filling
- 8 ounces full-fat cream cheese, softened to room temperature
- 1/2 cup powdered sugar
- 1 20-ounce can crushed pineapple, thoroughly drained
- 1 8-ounce container frozen whipped topping, thawed completely
Understanding the Key Ingredients
The graham cracker crumbs provide the necessary structure to support the thick layer of filling. Using melted butter binds these crumbs together, ensuring the crust holds its shape when sliced, while a touch of granulated sugar adds a subtle sweetness and helps the crust set firmly when chilled.
In the filling, full-fat cream cheese serves as a rich, tangy base that balances the overall sweetness of the dessert. Powdered sugar dissolves easily into the cream cheese, preventing any gritty texture that might occur with granulated sugar. The crushed pineapple provides the primary tropical flavor and a pleasant textural chew. Finally, the whipped topping aerates the dense cream cheese, transforming it into a light, fluffy mousse that slices cleanly.
Ingredient Notes and Substitutions
If you want to experiment with the flavor of the crust, you can substitute the graham cracker crumbs with an equal amount of crushed vanilla wafers, shortbread cookies, or golden sandwich cookies. If you use a sweeter cookie, you may want to reduce or entirely omit the granulated sugar in the crust mixture to maintain a balanced flavor.
For the filling, it is possible to replace the frozen whipped topping with homemade whipped cream. To do this, whip one and a half cups of cold heavy whipping cream until stiff peaks form, and gently fold it into the cream cheese mixture. Keep in mind that heavy whipping cream is slightly less stable than commercial whipped topping, so the final dessert may have a softer set and will require the full chilling time to slice cleanly.
You can use a low-fat cream cheese if you prefer, but avoid using fat-free cream cheese or cream cheese spread from a tub. These products contain higher water content and different stabilizers, which can result in a soft, runny filling that will not hold its shape when served.
Equipment Needed
- 8×8-inch baking dish: A glass or ceramic dish works beautifully and allows the distinct layers to be seen.
- Mixing bowls: You will need one medium bowl for the crust and one large mixing bowl for the filling.
- Hand-held electric mixer: Essential for beating the cream cheese and powdered sugar until completely smooth.
- Fine-mesh strainer: Crucial for draining the excess juice from the crushed pineapple.
- Rubber spatula: Helpful for scraping down the sides of the bowl and gently folding the ingredients together.
- Flat-bottomed measuring cup: The flat surface makes pressing the crust into the baking dish quick and even.
How to Make the Recipe
- Prepare the crust mixture: In a medium mixing bowl, combine the graham cracker crumbs and the granulated sugar. Pour the melted butter over the dry ingredients. Stir the mixture thoroughly with a fork or rubber spatula until all the crumbs are evenly coated with the butter. The mixture should resemble damp sand.
- Press the crust: Transfer the crumb mixture into your 8×8-inch baking dish. Spread the crumbs out into an even layer. Using the bottom of a flat measuring cup or a sturdy glass, press the crumbs firmly and evenly into the bottom of the dish. A firmly packed crust will slice easily later. Place the dish in the refrigerator to chill while you prepare the filling.
- Drain the pineapple: Place a fine-mesh strainer over a bowl and pour the canned crushed pineapple into it. Use the back of a large spoon to actively press down on the pineapple, forcing out as much juice as possible. The pineapple must be very dry to prevent the filling from becoming watery. Discard the juice or save it for another use.
- Whip the cream cheese base: In a large mixing bowl, beat the softened room-temperature cream cheese with a hand-held electric mixer on medium speed for about two minutes, until it is creamy and smooth. Add the powdered sugar and beat for another minute until the mixture is completely incorporated and free of lumps. Scrape down the sides and bottom of the bowl with a rubber spatula.
- Incorporate the pineapple and whipped topping: Add the thoroughly drained crushed pineapple to the cream cheese mixture and fold it in gently using the rubber spatula. Once combined, add the thawed whipped topping. Use a sweeping, folding motion to incorporate the whipped topping, being careful not to deflate the mixture. Continue folding until no white streaks remain.
- Assemble the dessert: Remove the chilled graham cracker crust from the refrigerator. Spoon the fluffy pineapple filling evenly over the crust. Use an offset spatula or the back of a spoon to smooth the top into an even, flat layer.
- Chill thoroughly: Cover the baking dish tightly with plastic wrap, ensuring the wrap does not touch the surface of the filling. Place the dish in the refrigerator and chill for at least four hours, or preferably overnight. The dessert is fully set when the center feels firm to the touch and the slices hold their shape when cut.
Tips for the Best Results
- Use Room Temperature Cream Cheese: Taking your cream cheese out of the refrigerator at least an hour before you begin is vital. Cold cream cheese will not blend smoothly with the powdered sugar, resulting in an unappealing lumpy texture in your final filling.
- Press the Pineapple Dry: Simply letting the pineapple sit in a strainer is not enough. You must actively press the fruit with a spoon to extract the hidden moisture. The drier the pineapple, the firmer and creamier your dessert will be.
- Pack the Crust Tightly: Spend an extra minute pressing the graham cracker mixture into the corners and edges of the pan. A loosely packed crust will crumble and fall apart when you attempt to serve the dessert.
- Fold, Do Not Stir: When adding the whipped topping, use a gentle folding technique rather than vigorously stirring. Whipped topping contains trapped air, which gives this dessert its signature fluffy volume. Stirring too aggressively will knock the air out and create a dense, flat filling.
- Respect the Chill Time: This dessert relies entirely on cold temperatures to solidify the butter in the crust and stabilize the cream cheese in the filling. Cutting into it too early will result in a messy, slumping slice.
- Wipe Your Knife Between Slices: For the cleanest presentation, use a sharp chef’s knife to cut the chilled dessert, and wipe the blade clean with a damp paper towel between every single cut.
Common Mistakes to Avoid
- Using Warm Melted Butter: If your melted butter is still piping hot when you mix it with the graham cracker crumbs, it can melt the sugar and create a hard, somewhat greasy crust. Let the butter cool for a few minutes before mixing.
- Adding Too Much Liquid: Failing to drain the pineapple adequately is the most common reason this recipe fails. Excess juice will thin out the cream cheese and cause the entire dessert to turn into a soupy puddle in the baking dish.
- Using Frozen Whipped Topping: If your whipped topping is still partially frozen, it will not fold evenly into the cream cheese, leaving you with icy pockets and an uneven texture. Thaw it completely in the refrigerator before starting.
- Overmixing the Filling: Once you add the whipped topping, mix only until the ingredients are just combined. Overworking the mixture will break down the structure of the whipped topping, leading to a heavy, dense dessert rather than a light, airy one.
Serving Suggestions
This sweet and creamy dessert pairs wonderfully with toppings that enhance its tropical flavor profile. Consider sprinkling toasted shredded coconut over the top just before slicing to add a pleasant crunch and a complementary flavor. A garnish of fresh mint leaves or a single maraschino cherry on each square adds a vibrant pop of color.
If you want to serve it alongside other items, it works beautifully on a dessert buffet next to a fresh fruit salad made of mango, kiwi, and strawberries. For beverages, pair it with freshly brewed iced tea, a sparkling citrus water, or a hot cup of black coffee to balance the sweetness of the filling.
Storage and Reheating
Because this dessert contains dairy products, it must be stored in the refrigerator. Keep the baking dish tightly covered with plastic wrap or transfer leftover slices to an airtight storage container. It will remain fresh and maintain its texture in the refrigerator for up to four days. As the days pass, the graham cracker crust may soften slightly as it absorbs moisture from the filling, but the flavor will remain excellent.
If you need to store it for a longer period, this dessert freezes reasonably well. To freeze, wrap the entire dish tightly in a layer of plastic wrap followed by a layer of aluminum foil to prevent freezer burn. You can freeze it for up to one month. When you are ready to serve it, transfer the dish to the refrigerator and allow it to thaw slowly overnight. Do not attempt to thaw it at room temperature or in the microwave, as the sudden temperature change will cause the cream cheese mixture to separate and weep liquid.
Frequently Asked Questions
Can I make this dessert a day in advance?
Yes, this recipe is actually better when made a day in advance. A full 12 to 24 hours in the refrigerator allows the flavors to meld beautifully and gives the filling ample time to set up completely, resulting in much cleaner slices.
Can I use fresh pineapple instead of canned?
While canned crushed pineapple is the most convenient and consistent option, you can use fresh pineapple. You will need to core and very finely chop or pulse the fresh pineapple in a food processor until it mimics the texture of crushed pineapple. Fresh pineapple holds a lot of water, so you must still press it thoroughly through a fine-mesh strainer to remove the excess juice before adding it to the cream cheese.
How do I know when the dessert is fully set?
You will know the dessert is ready to serve when the top feels firm and slightly springy to a gentle touch. If you make a small cut near the edge and the filling immediately slumps back into the slice mark, it needs more time in the refrigerator.
Why did my crust stick to the bottom of the pan?
If your crust is sticking stubbornly to the pan, it usually means it was pressed down too hard, or the pan was very cold before the mixture was added. Letting the baking dish sit at room temperature for just five minutes before slicing can loosen the butter in the crust slightly, making it easier to serve.
Can I double this recipe for a larger crowd?
Absolutely. You can easily double all the ingredients and prepare the dessert in a 9×13-inch rectangular baking dish. The preparation steps remain exactly the same, though you may need a slightly longer chill time due to the increased volume of the filling.
What should I do if my filling looks runny before chilling?
If the filling appears unusually thin before you pour it over the crust, it is likely that the pineapple was not drained enough or the whipped topping was overmixed. While you cannot extract the liquid once it is mixed, chilling the dessert in the freezer for one to two hours before moving it to the refrigerator can help it set up firmly enough to slice.
Final Thoughts
Creating a beautiful, layered dessert does not have to involve turning on the oven or spending hours managing complex baking steps. By relying on a simple crumb base and a rich, airy cream cheese topping, you can produce a chilled treat that looks elegant and tastes incredibly refreshing. The next time you need a dependable, make-ahead sweet for a warm afternoon, gather your ingredients and try this No-Bake Pineapple Dream Dessert. It offers a wonderful balance of textures and bright, tropical flavors that will easily satisfy any crowd.