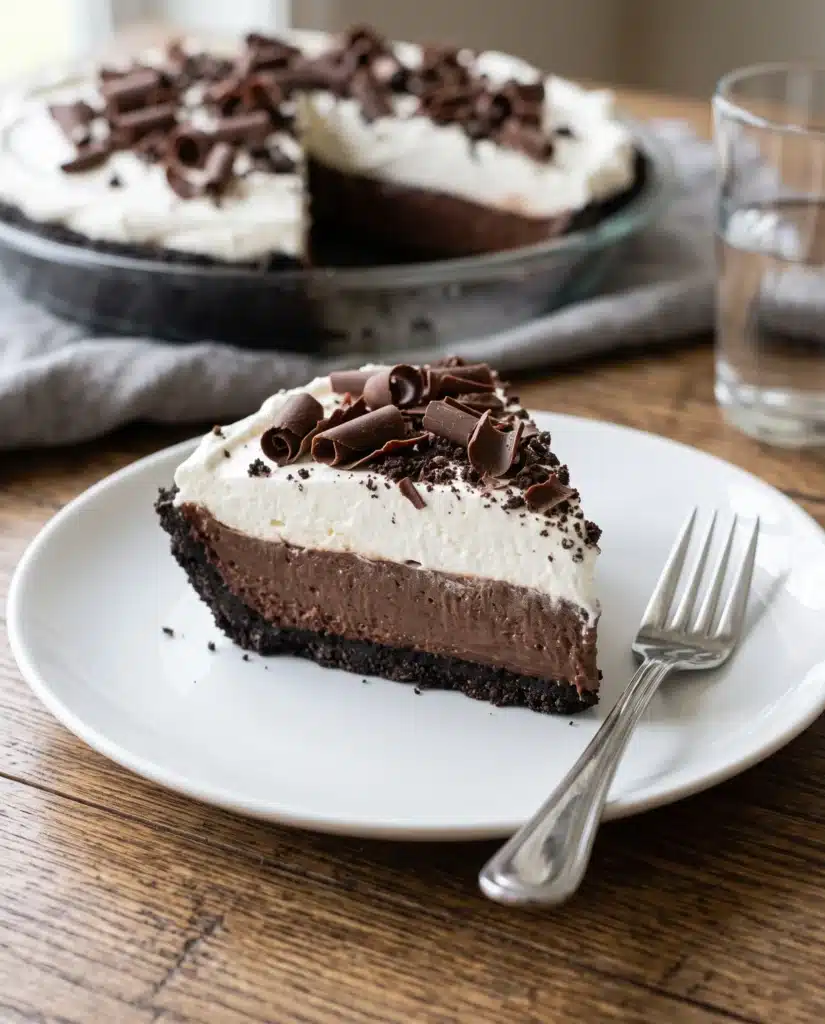
There is something undeniably comforting about a rich, chilled dessert that requires minimal effort and delivers maximum satisfaction. This no-bake chocolate pudding pie offers a wonderful contrast of textures and flavors, combining a crisp chocolate cookie crust with a velvety chocolate filling and an airy, cloud-like topping. The filling itself is a clever blend of rich instant chocolate pudding and fluffy whipped topping, creating a mousse-like consistency that feels remarkably light on the palate.
Because this dessert does not require an oven, it is an excellent choice for warm summer days when you want to keep your kitchen cool. It is equally suitable for busy holiday gatherings when oven space is occupied by savory main dishes and sides. The entire preparation process takes only a few minutes of active kitchen time, leaving the refrigerator to do the heavy lifting as the pie sets into a sliceable, smooth masterpiece. Finished with delicate chocolate curls, this pie presents beautifully, looking as though it took hours to prepare despite its straightforward method. Whether you are hosting a casual weekend barbecue, preparing a weeknight family treat, or bringing a dish to a neighborhood potluck, this no-bake chocolate pudding pie provides a reliable, crowd-pleasing option that consistently impresses.
Why You’ll Love This Recipe
- Simple preparation: With just a few basic steps involving whisking, folding, and spreading, this recipe is accessible to cooks of all skill levels, including beginners.
- Accessible ingredients: The recipe relies on easily obtainable pantry and refrigerator staples that you can find at any local grocery store.
- No oven required: Keeping the oven off is ideal for hot weather baking or when you simply want to avoid heating up your kitchen.
- Make-ahead convenience: Because this pie requires several hours to chill and set properly, it is designed to be made in advance, reducing your stress on the day you plan to serve it.
- Appealing flavor and texture: The combination of a crunchy cookie base, a silky chocolate middle, and a fluffy top layer creates a deeply satisfying dessert experience.
- Adaptable components: The basic formula allows for easy customization if you want to experiment with different crusts or pudding flavors down the line.
Ingredients You’ll Need
For the Base and Filling
- 1 pre-made chocolate cookie pie crust (9-inch)
- 1 box (3.9 ounces) instant chocolate pudding mix
- 1 1/2 cups cold whole milk
- 4 ounces (half of an 8-ounce tub) frozen whipped topping, thawed
For the Topping and Garnish
- 4 ounces (remaining half of the 8-ounce tub) frozen whipped topping, thawed
- 1 standard-sized milk chocolate bar
The instant chocolate pudding mix serves as the foundation for the filling, providing a concentrated chocolate flavor and the necessary thickeners to help the pie set quickly. Whole milk activates the pudding mix; using cold milk ensures the thickening agents work effectively. The whipped topping plays a dual role in this recipe. Half of it is folded directly into the chocolate pudding to lighten the texture, transforming it from a dense pudding into a smooth, airy mousse. The remaining half is spread generously over the top for a clean, contrasting finish. Finally, the pre-made chocolate cookie crust provides a sturdy, sweet, and slightly crunchy vessel that holds the filling together while complementing the chocolate notes within.
Ingredient Notes and Substitutions
If you need to make adjustments based on what you have in your kitchen, several modifications will work well for this recipe.
It is crucial to use instant pudding mix rather than the cook-and-serve variety. Cook-and-serve pudding requires heat to activate the cornstarch thickeners and will remain a liquid if whisked strictly with cold milk. You can easily substitute the standard chocolate flavor with dark chocolate, chocolate fudge, or even milk chocolate instant pudding depending on how intense you want the cocoa flavor to be.
Whole milk yields the best texture and richness. If you must use milk with a lower fat content, such as two percent, the pie will still set, though the filling may be slightly less creamy. It is best to avoid non-dairy milks like almond or oat milk for this specific application, as they often prevent instant pudding from setting properly, resulting in a runny filling.
If you prefer not to use store-bought whipped topping, you can substitute heavy whipping cream. However, you will need to whip the heavy cream to stiff peaks yourself. For the best structural stability, especially if you plan to store the pie for a few days, stabilizing the homemade whipped cream with a small amount of gelatin or using store-bought whipped topping is recommended.
If you cannot find a pre-made chocolate cookie crust, a standard graham cracker crust will also work beautifully, offering a slightly honeyed flavor profile that contrasts nicely with the chocolate filling.
Equipment Needed
- Medium mixing bowl
- Wire whisk
- Flexible silicone or rubber spatula
- Vegetable peeler (for creating chocolate curls)
- Measuring cup (liquid)
How to Make the Recipe
- Prepare the pudding mixture: Pour the dry instant chocolate pudding mix into a medium mixing bowl. Add the cold whole milk. Using a wire whisk, stir the mixture briskly for about two minutes. You will notice the liquid quickly transforming into a thicker, smooth consistency that leaves a slight trail behind the whisk.
- Lighten the filling: Add exactly half of the thawed whipped topping to the bowl with the thickened pudding. Switch to a flexible rubber spatula and gently fold the whipped topping into the pudding. To fold properly, scrape the spatula along the bottom of the bowl and bring the mixture up and over the top. Continue this gentle motion until no white streaks remain and the mixture is an even, light brown color. Avoid stirring vigorously, which will deflate the airy texture you want to maintain.
- Fill the pie crust: Transfer the folded chocolate filling directly into the pre-made chocolate cookie crust. Use your rubber spatula to spread the filling evenly from the center out to the edges of the crust, creating a smooth, level surface.
- Add the top layer: Spoon the remaining half of the thawed whipped topping onto the center of the pie. Gently spread it outward over the chocolate filling. You can spread it entirely to the edges or leave a small border of the chocolate filling visible for visual contrast. Swirl the top lightly with the back of a spoon to create an attractive, wavy texture.
- Create the chocolate garnish: Hold the milk chocolate bar firmly in one hand. Take a vegetable peeler in your other hand and run the blade smoothly along the long edge of the chocolate bar. Allow the resulting chocolate curls to fall naturally over the top of the pie. Continue until you have a generous amount of curls decorating the surface.
- Chill the pie: Place the assembled pie into the refrigerator. Allow it to chill uncovered for at least four hours. This resting time is non-negotiable, as the cold environment allows the thickeners in the pudding to fully set, ensuring the pie holds its shape when sliced.
- Slice and serve: Once fully chilled and firm to the touch, remove the pie from the refrigerator. Cut into slices using a sharp knife, wiping the blade clean between cuts for the neatest presentation.
Tips for the Best Results
- Use very cold milk: The instant pudding thickens much more effectively and rapidly when the milk is poured straight from the refrigerator. Warm or room-temperature milk will slow down the setting process.
- Thaw the whipped topping properly: Move your frozen whipped topping from the freezer to the refrigerator the night before you plan to make the dessert. Microwaving whipped topping ruins its structure and causes it to turn into a liquid, which will ruin the texture of your pie.
- Master the folding technique: When combining the pudding and the whipped topping, patience is key. Vigorous stirring knocks the trapped air out of the whipped topping. A slow, lifting motion preserves the cloud-like texture of the filling.
- Warm the chocolate slightly for better curls: If your chocolate bar is very cold, the vegetable peeler will create small shards and splinters rather than large, sweeping curls. Hold the wrapped chocolate bar in your warm hands for a minute or two, or microwave it for no more than three to five seconds. The slightly softened chocolate will curl beautifully.
- Reduce the standard milk ratio: You will notice that the pudding box instructions typically call for two cups of milk. This recipe intentionally reduces the milk to one and a half cups to create a much firmer, sliceable pie filling.
- Wipe your knife between slices: For bakery-style, clean cuts that show off the distinct layers of crust, chocolate filling, and white topping, run your knife under hot water, dry it with a towel, and wipe it clean after every single slice.
Common Mistakes to Avoid
- Using the wrong pudding mix: Accidentally purchasing cook-and-serve pudding instead of instant pudding is a frequent error. If you use cook-and-serve pudding with cold milk, the pie will never set and will remain a soupy liquid.
- Adding too much liquid: Following the instructions on the pudding box rather than the recipe instructions will result in a soft set. The reduced amount of milk in this recipe is crucial for creating a filling firm enough to slice.
- Rushing the chilling process: Slicing into the dessert before it has chilled for at least four hours will cause the filling to spill out into the empty pie tin. The ingredients need time to meld and stabilize in a cold environment.
- Overmixing the filling: Mixing the whipped topping into the pudding too aggressively breaks down the structure of the topping, leading to a dense and heavy pie rather than a light and airy one.
Serving Suggestions
This dessert is rich and satisfying on its own, but it pairs wonderfully with several accompaniments. Serve chilled slices straight from the refrigerator alongside fresh berries, such as strawberries or raspberries. The slight tartness of the fruit cuts through the sweet, creamy layers of the pie beautifully.
For a more decadent presentation, drizzle a small amount of high-quality chocolate syrup or warm caramel sauce over the plate just before placing the slice down. A hot cup of dark roast coffee or a tall glass of cold milk makes an excellent beverage pairing, balancing the sweetness of the dessert. Because of its relaxed, informal style, this dish is highly appropriate for summer barbecues, family game nights, or casual holiday dinners.
Storage and Reheating
This no-bake dessert must be kept cold to maintain its structural integrity and food safety.
To store leftovers, keep the pie in the refrigerator. Most store-bought crusts come with a clear plastic insert that protects the crust during shipping. You can invert this plastic insert and use it as a convenient, dome-like lid to protect your pie. Alternatively, carefully drape plastic wrap over the top, using toothpicks inserted into the pie to prevent the plastic from sticking to the whipped topping. The pie will remain fresh and flavorful in the refrigerator for up to four days.
If you wish to store the dessert for a longer period, it freezes exceptionally well. Wrap the entire pie tightly in a layer of plastic wrap followed by a layer of aluminum foil. It can be frozen for up to one month. When you are ready to eat it, you can serve it semi-frozen for an ice-cream-pie experience, or allow it to thaw in the refrigerator overnight until it returns to its original creamy state. Reheating is never recommended, as heat will instantly melt the whipped topping and destroy the set of the pudding.
Frequently Asked Questions
Can I make this recipe ahead of time?
Yes, preparing this dish a day in advance is highly recommended. Letting it rest in the refrigerator overnight provides ample time for the flavors to meld and guarantees a firm, clean slice when you are ready to serve.
Why did my pie turn out runny?
A runny filling is usually the result of one of three factors: using cook-and-serve pudding instead of instant pudding, adding the full two cups of milk listed on the pudding box instead of the reduced amount listed in this recipe, or not allowing the dessert to chill for the full four hours required.
Can I use a different flavor of pudding?
Absolutely. The foundational method remains exactly the same whether you use vanilla, butterscotch, banana cream, or white chocolate instant pudding. Simply swap the chocolate mix for your preferred flavor and proceed with the rest of the instructions.
Do I have to use a store-bought crust?
No, you are welcome to make a homemade crust if you prefer. You will need about two cups of crushed chocolate sandwich cookies and five to six tablespoons of melted butter. Press the mixture firmly into a nine-inch pie dish and chill it for thirty minutes before adding the filling.
Can I freeze this to make it set faster?
While you can place it in the freezer for about an hour to speed up the initial firming process, you should transfer it to the refrigerator to finish setting. Freezing it solid too quickly can alter the texture of the pudding, making it icy rather than creamy.
Is there a trick to folding the whipped topping?
The key to folding is to use a wide, flexible spatula. Cut down through the middle of the pudding mixture, scrape along the bottom of the bowl, and lift the mixture up and over the whipped topping. Rotate the bowl slightly after each fold. This gentle motion incorporates the ingredients without pressing the air out.
How do I store the remaining whipped topping if I use heavy cream instead?
If you choose to whip your own heavy cream, you will need about one and a half cups of liquid heavy cream to yield the necessary amount of whipped cream. You can simply whip it all at once, fold half into the pudding, and use the rest for the top layer, eliminating any need to store leftovers.
Final Thoughts
Creating a memorable dessert does not require spending hours standing over a hot stove or managing complex baking techniques. By combining a few smart, ready-made ingredients with the right assembly methods, you can produce a dessert that looks elegant and tastes incredibly satisfying. The rich filling, fluffy topping, and crisp base make this no-bake chocolate pudding pie a reliable favorite that you will find yourself returning to time and time again. Gather your ingredients, take a few minutes to whisk and fold, and let your refrigerator handle the rest of the work.