Table of Contents
I still remember the first time I heard about sea moss gel. I was scrolling through Instagram one morning, sipping my coffee at the kitchen island while Lila and Caleb were busy coloring at the table. A wellness influencer I follow was raving about this “miracle from the ocean” and how she adds sea moss gel to everything. I’ll admit, I was skeptical at first – another trendy superfood that would probably taste like the bottom of a fish tank? But my curiosity eventually won out, and now making my own sea moss gel recipe has become part of my weekly routine.
If you’re looking for a simple way to boost your nutrition without a lot of fuss, this sea moss gel recipe might just become your new favorite kitchen staple too. The best part? Unlike some of those complicated health food preparations that require specialty equipment or hard-to-find ingredients, sea moss gel is surprisingly simple to make at home with just a few basic tools.
Before we dive in, if you’re in the mood for more health-conscious recipes, you might want to check out my AIP smoothie recipes which pair beautifully with this sea moss gel!
Why You’ll Love This Sea Moss Gel Recipe
This sea moss gel recipe has quickly become a favorite in our household for several reasons:
- Super simple preparation: Just 5 easy steps that even a kitchen novice can handle
- Incredibly versatile: Add it to smoothies, oatmeal, sauces, or even use it in homemade face masks
- Virtually tasteless: When prepared correctly, it adds nutrition without changing the flavor of your foods
- Budget-friendly: Making your own gel is much more economical than buying pre-made versions
- Customizable: You can keep it plain or add subtle flavor enhancers like lime or cinnamon
- Nutrient powerhouse: Packed with minerals like iodine, potassium, and magnesium
- Long shelf life: Your homemade gel can last up to 3 weeks in the refrigerator
Ingredients for Sea Moss Gel
Here’s everything you’ll need to make your own sea moss gel at home:
- 1/2 cup dried sea moss (about 2 oz/56g)
- 3 cups filtered water (plus extra for soaking)
- 1 lime (optional, for cleaning)
- 1 cinnamon stick or 1 vanilla bean (optional, for subtle flavor)
Substitution tips: If you can’t find sea moss (sometimes called Irish moss), look for it at health food stores, Caribbean markets, or online retailers. Always opt for wildcrafted sea moss when possible, which tends to be more nutrient-dense than pool-grown varieties.
Timing
- Prep time: 10 minutes
- Soaking time: 12-24 hours
- Blending time: 5 minutes
- Setting time: 2-3 hours
- Total time: 14-28 hours (mostly passive)
Step-by-Step Instructions
Step 1: Clean the Sea Moss
Start by placing your dried sea moss in a large bowl and covering it with filtered water. The sea moss will likely have some salt and possibly small debris from the ocean, so this initial rinse is important.
Gently massage and work through the sea moss with your fingers, removing any visible debris, small shells, or sand. If you’d like, you can squeeze half a lime into the water – the citric acid helps to clean the sea moss naturally.
Drain this first rinse water and repeat the process once more until the water runs clear. This usually takes 2-3 rinses.
Tip: Don’t worry about the color of your sea moss. It can range from golden to purple to dark brown – all are natural variations and equally nutritious!
Step 2: Soak the Sea Moss
After cleaning, place your sea moss in a clean bowl and cover it with 3 cups of filtered water. The sea moss will expand quite a bit during soaking, so make sure you use a bowl that’s large enough.
Allow the sea moss to soak for 12-24 hours at room temperature. I usually prepare mine in the evening and let it soak overnight, so it’s ready to blend the next day. During this time, you’ll notice the sea moss expanding and becoming gelatinous as it absorbs the water.
Tip: If you live in a very warm climate, you can soak the sea moss in the refrigerator to prevent any fermentation.
Step 3: Prepare for Blending
After soaking, your sea moss will have transformed dramatically – expanding to several times its original size and becoming soft and gel-like. Drain out most of the soaking water, but reserve it in a measuring cup.
Add the sea moss to your blender along with 1 cup of the reserved soaking water. This soaking water contains minerals that have leached out of the sea moss, so it’s beneficial to use it.
If you’d like to add some subtle flavor, this is the time to add a cinnamon stick or split vanilla bean to the blender. These flavors work well when you plan to use the gel in sweet recipes like smoothies or oatmeal.
Step 4: Blend Until Smooth
Secure the lid on your blender and start blending on low speed, gradually increasing to high. Blend for 1-2 minutes until the mixture is completely smooth with no remaining chunks.
If the mixture is too thick and having trouble blending, add a little more of the reserved soaking water, a tablespoon at a time, until the blender can process it smoothly.
The consistency you’re aiming for is similar to a thick smoothie at this stage – it will set up more firmly in the refrigerator.
Tip: If you don’t have a high-powered blender, you might need to stop occasionally to scrape down the sides and give your blender a rest if it starts to overheat.
Step 5: Transfer and Set
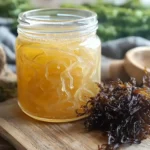
Pour your freshly blended sea moss gel into a clean glass jar with a tight-fitting lid. Mason jars work perfectly for this. Make sure to use a rubber spatula to get every last bit of goodness out of the blender.
Place the jar in the refrigerator and allow the gel to set for 2-3 hours. The gel will thicken significantly during this time, reaching a consistency similar to thick jelly or pudding.
Once set, your sea moss gel is ready to use! A typical serving size is 1-2 tablespoons per day.
Looking for something warming to complement your health routine? My lemon balm tea recipe makes a perfect pairing with sea moss-enhanced smoothies!
Cooking Tips for Perfect Sea Moss Gel
After making sea moss gel dozens of times, I’ve picked up a few tricks that help achieve the perfect consistency:
- Quality matters: The clarity of your final gel depends greatly on how well you clean the sea moss. Take your time with the cleaning process.
- Temperature affects setting: The colder your refrigerator, the more firmly your gel will set. If you want a looser gel, you can adjust by adding more water during blending.
- Avoid metal: When possible, use wooden, silicone, or plastic utensils when handling sea moss. Some believe metal can reduce the mineral content (though I haven’t seen conclusive evidence of this, it’s a traditional practice worth noting).
- Water ratio: The standard ratio is about 1 part dried sea moss to 6 parts water, but you can adjust based on your preferred consistency.
- Bubbles happen: Don’t worry if you see some small bubbles in your gel after blending – these will disappear as it sets in the refrigerator.
- Patience pays off: The longer you soak the sea moss, the softer it becomes and the smoother your final gel will be.
My Sea Moss Story
The first time I made sea moss gel, Lila was peering over the counter with wide eyes, asking, “Mommy, are you making ocean jelly?” I couldn’t help but laugh at her description, because that’s exactly what it looked like!
Eric was even more skeptical than I had been initially. He watched from across the kitchen with raised eyebrows as I blended this strange sea plant into goop. But now? He’s the one who reminds me when our jar is running low, especially since he started adding it to his post-workout smoothies.
What won me over wasn’t just the nutritional benefits, but how seamlessly it fits into our busy family life. On mornings when I’m racing to get lunches packed and kids dressed, I can quickly add a spoonful to our breakfast smoothies knowing I’m giving everyone a nutritional boost without any extra effort.
Nutritional Information
Sea moss gel is truly a nutritional powerhouse, containing 92 of the 102 minerals that our bodies need, including:
- Iodine: Essential for thyroid function and metabolism
- Potassium: Supports heart and muscle function
- Calcium: Important for bone health
- Iron: Critical for blood health and oxygen transport
- Magnesium: Supports muscle and nerve function
- Zinc: Crucial for immune system health
One tablespoon (15ml) of homemade sea moss gel contains approximately:
- Calories: 5
- Carbohydrates: 1g
- Protein: <1g
- Fat: 0g
- Fiber: <1g
Unlike many supplements, sea moss delivers these nutrients in a form that’s easily absorbed by the body. The gel itself is also rich in mucilage, a type of soluble fiber that can support digestive health.
Healthier Alternatives
If you’re looking to customize this sea moss gel recipe to fit specific dietary needs, here are some variations to consider:
-
For strictly raw diets: Skip the blending and simply mash the soaked sea moss with a fork or potato masher. The texture will be less smooth but preserves any heat-sensitive nutrients.
-
Flavor variations:
- Add a 1-inch piece of fresh ginger while blending for a spicy kick
- Blend in 1 teaspoon of honey or maple syrup for a touch of sweetness
- Include 1 teaspoon of lime zest for a refreshing citrus note
-
For higher iodine content: Add 1 tablespoon of bladderwrack (another type of seaweed) during the soaking stage
-
Lower sodium option: Rinse the sea moss more thoroughly and increase the soaking changes to reduce the natural salt content
Serving Suggestions
There are countless ways to incorporate sea moss gel into your daily routine:
- Morning smoothies: Add 1-2 tablespoons to your favorite smoothie recipe – it’s virtually undetectable
- Breakfast bowls: Stir into oatmeal, chia pudding, or yogurt
- Baked goods: Replace up to 1/4 of the liquid in muffins, pancakes, or bread recipes
- Soups and stews: Stir in a tablespoon or two during the last few minutes of cooking to thicken naturally
- Homemade salad dressings: Add a small amount to help emulsify and thicken dressings
- Vegan desserts: Use as a plant-based gelatin alternative in puddings or mousses
- Face masks: Apply directly to clean skin for a mineral-rich face mask (just be sure to use a separate batch for skincare)
My personal favorite is adding a tablespoon to my morning coffee with a splash of vanilla almond milk. The gel adds a silky texture without changing the flavor.
Common Mistakes to Avoid
Even though this sea moss gel recipe is relatively simple, there are a few pitfalls to watch out for:
-
Insufficient cleaning: If you don’t clean the sea moss thoroughly, your gel may have a stronger “ocean” taste or gritty texture.
-
Overblending: Blending too long can incorporate too much air, making your gel foamy rather than smooth.
-
Using tap water: Chlorine and other chemicals in tap water can react with the sea moss and affect both taste and nutritional content. Always use filtered water.
-
Consuming too much: While sea moss is beneficial, its high iodine content means moderation is important. Start with small amounts (1 teaspoon daily) and gradually work up to 1-2 tablespoons per day.
-
Unsafe storage: Using unclean containers can introduce bacteria and shorten the shelf life of your gel.
Storing & Reheating Tips
Proper storage is key to making your sea moss gel last:
-
Refrigerator storage: Your homemade sea moss gel will last 2-3 weeks when stored in an airtight glass container in the refrigerator.
-
Freezer option: For longer storage, freeze sea moss gel in ice cube trays, then transfer the frozen cubes to a freezer bag. These will last up to 3 months. Simply thaw a cube when needed.
-
Signs of spoilage: If you notice any sour smell, mold, or significant change in texture or color, discard the gel.
-
Separation is normal: If you see some liquid separation at the top of your stored gel, this is completely normal. Simply stir it back in before using.
-
Avoid contamination: Always use clean utensils when scooping out gel from your storage container to prevent introducing bacteria.
For easy meal prep, try my forgotten chicken recipe – you can add a spoonful of sea moss gel to the sauce for extra nutrition without changing the flavor!
FAQs About Sea Moss Gel
Q: Is sea moss the same as carrageenan?
A: While carrageenan is extracted from sea moss and other red algae, they’re not identical. Sea moss in its whole form contains many more nutrients than isolated carrageenan, which is just one compound used as a food additive.
Q: Can I take sea moss gel daily?
A: Most experts recommend consuming 1-2 tablespoons of sea moss gel daily. Because of its iodine content, it’s best to start with small amounts and work your way up, and consult with a healthcare provider if you have thyroid conditions.
Q: Why does my sea moss gel have a fishy taste?
A: A strong ocean taste usually indicates it wasn’t rinsed thoroughly enough. More thorough rinsing, adding citrus during cleaning, or flavoring the gel with vanilla or cinnamon can help mask any oceanic notes.
Final Thoughts
Making your own sea moss gel recipe at home isn’t just about jumping on a wellness trend – it’s about connecting with traditional food practices that have nourished coastal communities for generations. There’s something deeply satisfying about transforming this humble sea vegetable into a versatile gel that can silently boost the nutrition of nearly everything we eat.
What I love most about this sea moss gel recipe is how it embodies what I believe cooking should be: simple, accessible, and serving a purpose beyond just filling our bellies. It’s about nourishment that fits into real life – no fancy equipment or complicated techniques required.
Whether you’re stirring it into your morning coffee, blending it into smoothies for the kids (who won’t detect a thing!), or exploring its benefits in homemade skincare, sea moss gel is one of those rare additions to your kitchen that’s truly as versatile as it is beneficial.
I’d love to hear how you incorporate sea moss gel into your own kitchen routines! Drop me a comment below sharing your favorite way to use it, or any questions about the process. Your sea moss journey is just beginning!
Sea moss gel recipe: How to make it in 5 simple steps
Total Time: 10 minutes
Yield: 2 cups 1x
Diet: Vegan
Description
Ingredients
Scale
Here’s everything you’ll need to make your own sea moss gel at home:
- 1/2 cup dried sea moss (about 2 oz/56g)
- 3 cups filtered water (plus extra for soaking)
- 1 lime (optional, for cleaning)
- 1 cinnamon stick or 1 vanilla bean (optional, for subtle flavor)
Instructions
Start by placing your dried sea moss in a large bowl and covering it with filtered water. The sea moss will likely have some salt and possibly small debris from the ocean, so this initial rinse is important.
Gently massage and work through the sea moss with your fingers, removing any visible debris, small shells, or sand. If you’d like, you can squeeze half a lime into the water – the citric acid helps to clean the sea moss naturally.
Drain this first rinse water and repeat the process once more until the water runs clear. This usually takes 2-3 rinses.
Tip: Don’t worry about the color of your sea moss. It can range from golden to purple to dark brown – all are natural variations and equally nutritious!
After cleaning, place your sea moss in a clean bowl and cover it with 3 cups of filtered water. The sea moss will expand quite a bit during soaking, so make sure you use a bowl that’s large enough. Allow the sea moss to soak for 12-24 hours at room temperature. I usually prepare mine in the evening and let it soak overnight, so it’s ready to blend the next day. During this time, you’ll notice the sea moss expanding and becoming gelatinous as it absorbs the water. Tip: If you live in a very warm climate, you can soak the sea moss in the refrigerator to prevent any fermentation. After soaking, your sea moss will have transformed dramatically – expanding to several times its original size and becoming soft and gel-like. Drain out most of the soaking water, but reserve it in a measuring cup. Add the sea moss to your blender along with 1 cup of the reserved soaking water. This soaking water contains minerals that have leached out of the sea moss, so it’s beneficial to use it. If you’d like to add some subtle flavor, this is the time to add a cinnamon stick or split vanilla bean to the blender. These flavors work well when you plan to use the gel in sweet recipes like smoothies or oatmeal. Secure the lid on your blender and start blending on low speed, gradually increasing to high. Blend for 1-2 minutes until the mixture is completely smooth with no remaining chunks. If the mixture is too thick and having trouble blending, add a little more of the reserved soaking water, a tablespoon at a time, until the blender can process it smoothly. The consistency you’re aiming for is similar to a thick smoothie at this stage – it will set up more firmly in the refrigerator. Tip: If you don’t have a high-powered blender, you might need to stop occasionally to scrape down the sides and give your blender a rest if it starts to overheat. Pour your freshly blended sea moss gel into a clean glass jar with a tight-fitting lid. Mason jars work perfectly for this. Make sure to use a rubber spatula to get every last bit of goodness out of the blender. Place the jar in the refrigerator and allow the gel to set for 2-3 hours. The gel will thicken significantly during this time, reaching a consistency similar to thick jelly or pudding. Once set, your sea moss gel is ready to use! A typical serving size is 1-2 tablespoons per day. Looking for something warming to complement your health routine? My lemon balm tea recipe makes a perfect pairing with sea moss-enhanced smoothies!
- Prep Time: 10 minutes
- Cook Time: 0 minutes
- Category: Superfood Preparation
- Method: No-Cook
- Cuisine: American
Nutrition
- Serving Size: 2 tablespoons
- Calories: 5 per tablespoon
Keywords: sea moss gel recipe, homemade sea moss gel, irish moss gel, vegan gelatin alternative, how to make sea moss gel