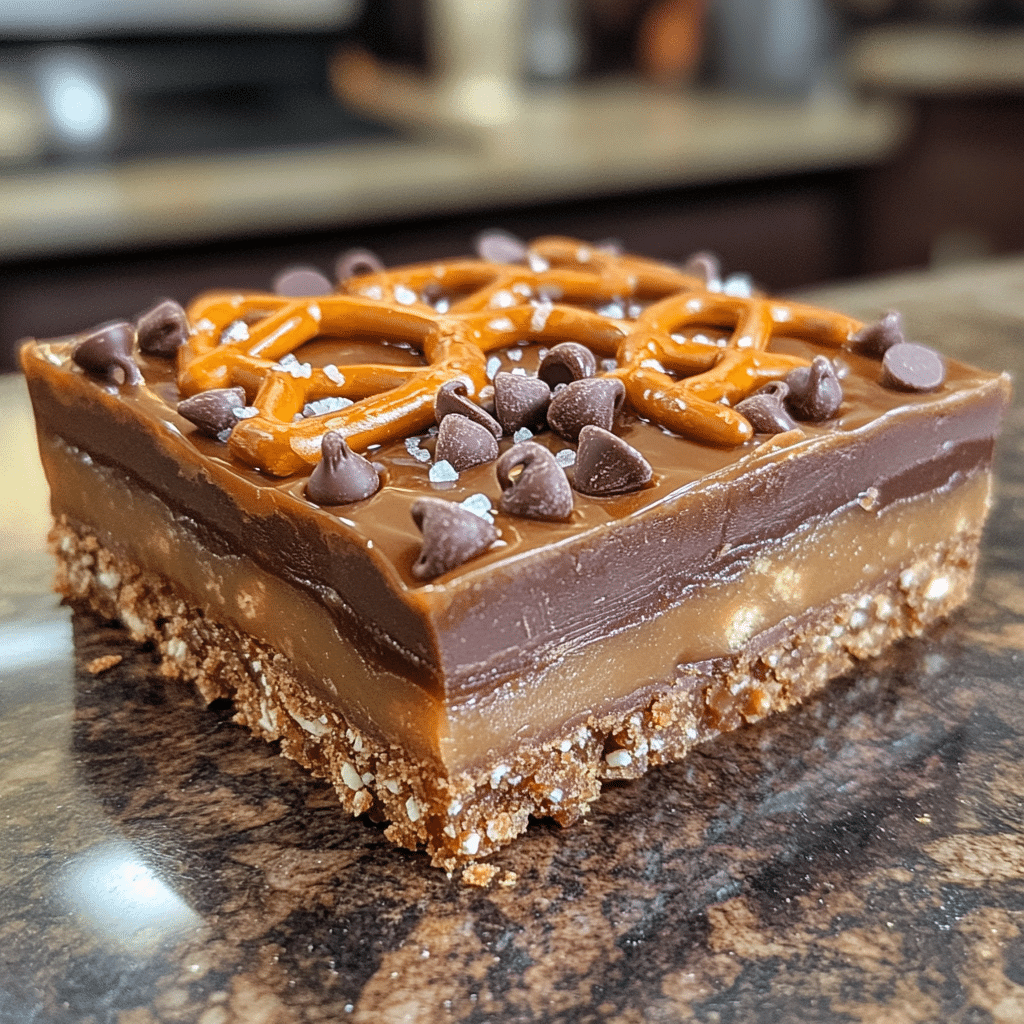
Sweet, Salty, and Sinfully Easy
I’ve been making these No-Bake Salted Caramel Pretzel Bars for five years now, and they’ve never once failed to disappear within minutes. These No-Bake Salted Caramel Pretzel Bars are the ultimate crowd-pleaser that delivers restaurant-quality flavor without ever turning on your oven. Rich, crunchy, and impossibly addictive—these No-Bake Salted Caramel Pretzel Bars are so simple that even kitchen newbies can pull them off flawlessly.
If you’ve ever been intimidated by complicated desserts or worried about baking disasters, this recipe will change your life. These bars are foolproof, require zero baking skills, and taste like you ordered them from an expensive bakery. Your family will beg you to make them again and again!
🎯 Why These Pretzel Bars Are About to Become Your Signature Dessert
✅ Zero Oven Time Required No preheating, no watching through the oven door, no burnt bottoms—just mix, layer, and chill. Perfect for hot summer days!
✅ Texture Heaven in Every Bite Crunchy pretzels meet buttery graham crackers, gooey caramel, melty chocolate, and that perfect sea salt finish. It’s a flavor explosion!
✅ Make-Ahead Miracle Whip these up the night before your event and pull them straight from the fridge when guests arrive. Stress-free entertaining at its finest!
✅ Budget-Friendly Showstopper Uses everyday ingredients you probably already have, but tastes like you spent a fortune at a specialty bakery.
🔥 The Secret to Perfect No-Bake Salted Caramel Pretzel Bars
You might be thinking—can something this easy really taste amazing?
The magic is in the contrast. The salty crunch of pretzels against sweet caramel creates an irresistible sweet-and-salty balance that keeps people coming back for “just one more piece.” The graham crackers add structure and buttery richness, while the chocolate chips provide pockets of melty goodness throughout.
The key is pressing that base layer FIRMLY—don’t be gentle! A well-packed foundation means your bars will slice cleanly and hold together perfectly. And that finishing sprinkle of sea salt? That’s what transforms these from delicious to absolutely extraordinary.
🍫 Rave Reviews from Family and Friends
💬 “I made these for my book club and everyone demanded the recipe immediately!” – Jennifer M. 💬 “My husband hid the second batch so the kids wouldn’t eat them all. That good.” – Rachel K. 💬 “Brought these to a potluck and they disappeared before the main course!” – David L.
📌 Creative Variations to Try
Once you’ve mastered the original, get creative with these tested variations:
Peanut Butter Paradise: Add 1/2 cup peanut butter to the base and use peanut butter chips instead of chocolate
Dark Chocolate Dream: Swap chocolate chips for dark chocolate chunks and use less caramel for sophisticated flavor
Toffee Crunch: Mix in 1/2 cup toffee bits with the chocolate chips for extra crunch
White Chocolate Wonder: Use white chocolate chips and drizzle melted white chocolate on top instead of caramel
Pro Tip: For cleaner cuts, wipe your knife between slices and use a gentle sawing motion rather than pressing straight down.
🧠 FAQs – All Your Questions Answered!
Can I use salted butter instead of unsalted?
You can, but reduce or omit the sea salt topping since salted butter will make the bars saltier overall.
My caramel layer won’t set—what happened?
Make sure you’re using sweetened condensed milk (thick and sweet), not evaporated milk. Also ensure you refrigerate for the full 3 hours minimum.
Can I make these gluten-free?
Absolutely! Use gluten-free pretzels and graham crackers. The rest of the ingredients are naturally gluten-free.
How far in advance can I make these?
These bars stay fresh in the refrigerator for up to 5 days, making them perfect for meal prep or early party preparation.
Why are my bars falling apart when I cut them?
The base likely wasn’t pressed firmly enough. Really pack it down hard! Also ensure they’re fully chilled before cutting.
🧊 Storage Tips
Keep your bars perfect with these storage tricks:
- Store in an airtight container in the refrigerator for up to 5 days
- Layer parchment paper between stacked bars to prevent sticking
- Can be frozen for up to 2 months—thaw in fridge before serving
- Let sit at room temperature for 5 minutes before serving for the best texture
- Don’t leave at room temperature for extended periods or the layers may soften too much
🎉 Perfect Occasions for No-Bake Salted Caramel Pretzel Bars
These versatile treats are perfect for:
- Potluck dinners and office parties
- Holiday cookie exchanges
- Bake sales and fundraisers
- Game day gatherings
- Teacher appreciation gifts
- Last-minute dessert emergencies
🔗 Helpful Resources
- Guide to Different Types of Caramel
- Best Parchment Paper for Baking
- Sea Salt vs. Table Salt: What’s the Difference?
- More No-Bake Dessert Recipes
📋 The Complete Recipe
Here’s everything you need to create these irresistible treats:

🍫 No-Bake Salted Caramel Pretzel Bars
🧺 Ingredients
For approximately 16 bars (8×8 inch pan):
- 2 cups pretzel sticks
- 1 cup graham cracker crumbs
- 1 cup unsalted butter (2 sticks), melted
- 1 cup brown sugar, packed
- 1 cup sweetened condensed milk
- 1 teaspoon vanilla extract
- 1 cup chocolate chips
- 1 cup caramel sauce
- Sea salt, for sprinkling
Tip: Use high-quality caramel sauce for the best flavor—homemade or jarred caramel works beautifully. Avoid ice cream topping as it’s too thin.
🍽️ Step-by-Step Instructions
Step 1: Prep Your Pan
Line an 8×8 inch square baking pan with parchment paper, leaving a 2-inch overhang on opposite sides. This creates handles for easy removal later. Lightly spray with cooking spray for extra insurance.
Step 2: Create the Crunchy Base
In a large mixing bowl, combine pretzel sticks and graham cracker crumbs. Mix thoroughly with a spatula or clean hands until evenly distributed throughout.
Step 3: Add the Sweet and Buttery Elements
Pour the melted butter over the pretzel mixture. Add packed brown sugar and mix vigorously until every crumb is coated and the mixture looks like wet sand with no dry spots remaining.
Step 4: Build Your Foundation
Transfer the mixture to your prepared pan. Here’s where you need to get aggressive—press down HARD with the back of a measuring cup or your hands. The firmer you pack it, the better your bars will hold together. Aim for an even, compact layer with no gaps.
Step 5: Mix the Caramel Layer
In a separate bowl, combine sweetened condensed milk, vanilla extract, and half of the caramel sauce (reserve the other half for later). Whisk until smooth and well blended.
Step 6: Create the Gooey Middle
Pour the caramel mixture over your pressed pretzel base. Use an offset spatula or the back of a spoon to spread it evenly from edge to edge, ensuring complete coverage.
Step 7: Add Chocolate Chips
Distribute chocolate chips evenly across the caramel layer. Let them sit for 30-60 seconds to soften from the warmth of the caramel, then gently press them down with your spatula so they nestle into the caramel.
Step 8: Drizzle with Caramel
Take your remaining caramel sauce and drizzle it artistically over the chocolate chips. Use a spoon or squeeze bottle for controlled drizzling, creating random patterns or neat lines—your choice!
Step 9: The Secret Weapon
Sprinkle a generous amount of flaky sea salt over the entire surface. Don’t be shy—this is what makes these bars truly special! The salt cuts through the sweetness and makes every flavor pop.
Step 10: Chill to Perfection
Cover the pan with plastic wrap and refrigerate for at least 3 hours, though overnight is ideal. The bars need to firm up completely for clean slicing.
Step 11: Slice and Serve
Using the parchment paper overhang, lift the entire block out of the pan onto a cutting board. Use a large, sharp knife to cut into 16 squares. For the cleanest cuts, wipe the knife between slices. Serve immediately or return to the fridge until ready to serve!
Nutrition (per bar):
Calories: ~285
Fat: 16g
Carbs: 35g
Sugar: 28g
Protein: 3g
✨ Final Thoughts
Whether you’re a baking beginner or a seasoned pro looking for a shortcut, these No-Bake Salted Caramel Pretzel Bars deliver maximum impact with minimum effort. They’re proof that you don’t need complicated techniques or fancy equipment to create something absolutely spectacular—you just need the right combination of flavors and a little patience while they chill!
The sweet-salty combination is scientifically proven to be irresistible (okay, maybe not scientifically, but one bite will convince you). Make a batch this weekend and watch them disappear. Just be warned: people will start requesting these for every occasion!