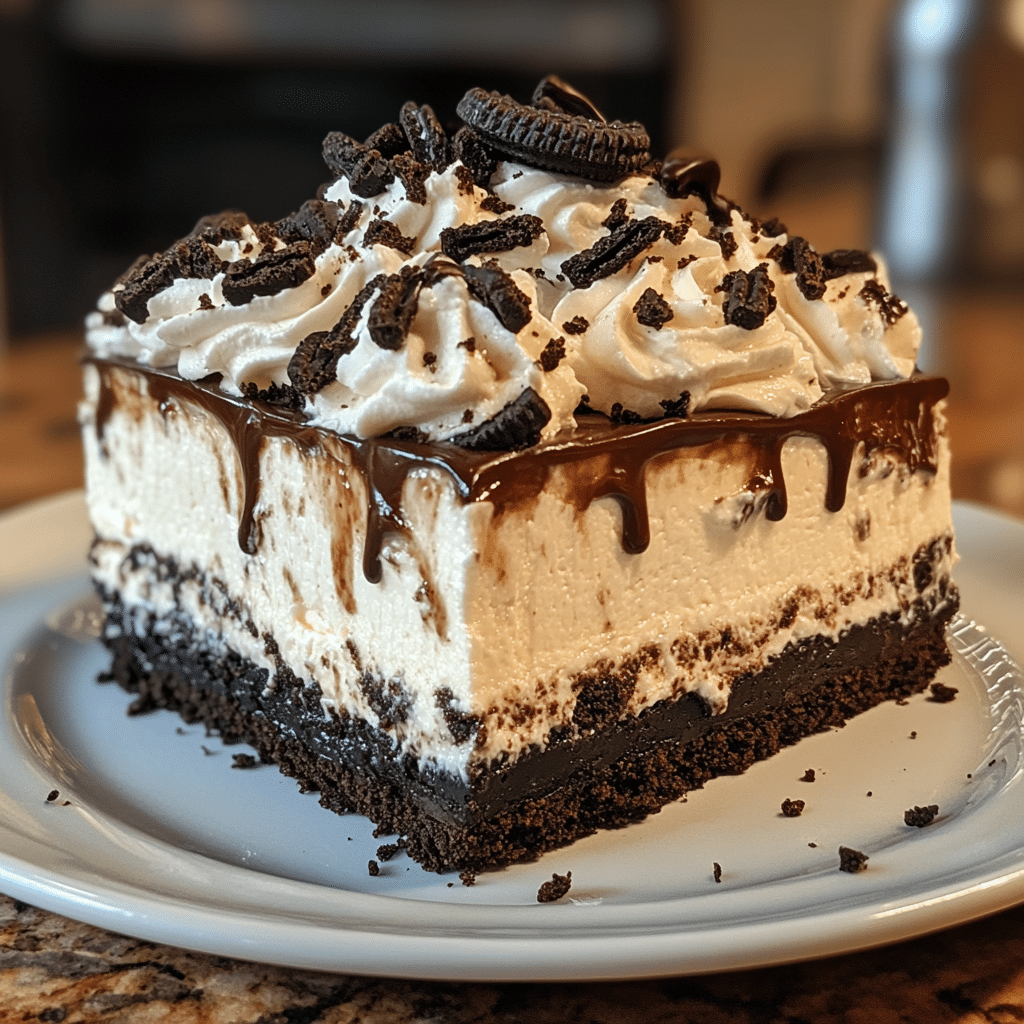
Why This No Bake Dessert is a Must-Try
If you’re on the hunt for a dessert that’s both indulgent and easy to prepare, look no further than this delightful treat. The No Bake Heavenly Oreo Dessert is a celebration of creamy layers, crunchy cookie goodness, and rich flavors—all without the need for an oven! Perfect for any occasion, whether it’s a casual family gathering or a sophisticated dinner party, this dessert is sure to impress. Not only does it come together in a snap, but it also requires minimal effort, allowing you to focus more on enjoying the moment with your loved ones.
Why You’ll Love This Recipe
- Quick and Easy: No baking means you can whip this up in no time!
- Decadent Layers: Creamy filling paired with crunchy Oreo layers create a perfect texture.
- Impressive Presentation: Layered desserts look stunning on any table.
- Customizable: Easy to adjust flavors and ingredients to your liking.
- Family-Friendly: A hit with both kids and adults alike!
- Make-Ahead: Prepare it in advance for stress-free entertaining.

Ingredients You’ll Need
For the Oreo Base
- 24 Oreo cookies, crushed
- 1/4 cup unsalted butter, melted
For the Creamy Filling
- 8 oz cream cheese, softened
- 1/2 cup powdered sugar
- 2 cups whipped topping (like Cool Whip)
- 1 tsp vanilla extract
For the Topping
- 8 Oreo cookies, crushed (for garnish)
- Chocolate syrup (optional, for drizzling)
Step-by-Step Instructions
- Prepare the Oreo Base: In a mixing bowl, combine the crushed Oreo cookies with melted butter. Stir until the mixture resembles wet sand.
- Form the Base: Press the Oreo mixture firmly into the bottom of a 9×9-inch baking dish to form an even layer. Set aside.
- Make the Creamy Filling: In a separate bowl, beat the softened cream cheese and powdered sugar together until smooth and creamy.
- Add Whipped Topping: Gently fold in the whipped topping and vanilla extract until fully combined with the cream cheese mixture.
- Layer the Filling: Spread the creamy filling over the Oreo base evenly, smoothing out the top with a spatula.
- Chill: Cover the dish with plastic wrap and refrigerate for at least 4 hours, or overnight if possible, to allow the dessert to set properly.
- Garnish: Before serving, top with crushed Oreo cookies and drizzle with chocolate syrup, if desired.
Serving Suggestions
This No Bake Heavenly Oreo Dessert stands beautifully on its own, but you can elevate your dessert experience with a few simple additions. Consider pairing it with:
- A scoop of vanilla ice cream for an extra creamy treat.
- Fresh berries like strawberries or raspberries for a pop of color and a fruity contrast.
- A drizzle of caramel sauce for a sweet, gooey touch.
- A cup of coffee or a dessert wine to complement the rich flavors.
Tips for Success
To ensure your No Bake Heavenly Oreo Dessert turns out perfect every time, keep these tips in mind:
- Make sure your cream cheese is softened to room temperature for easy mixing.
- For a firmer dessert, allow it to chill overnight—this helps the flavors meld beautifully.
- Use a spatula to spread the filling smoothly for a professional look.
- Feel free to experiment with different types of cookies for the base—try using chocolate sandwich cookies or even graham crackers for a different flavor profile.
Final Thoughts
This No Bake Heavenly Oreo Dessert is not just a recipe; it’s an experience of creamy, chocolatey bliss that you’ll want to share with everyone. With its effortless preparation and delightful taste, it’s bound to become a favorite in your household. Whether you’re serving it at a special occasion or simply indulging in a sweet treat at home, this dessert promises to satisfy your sweet tooth and leave everyone asking for seconds. So grab your ingredients, and let’s create some sweet memories together!