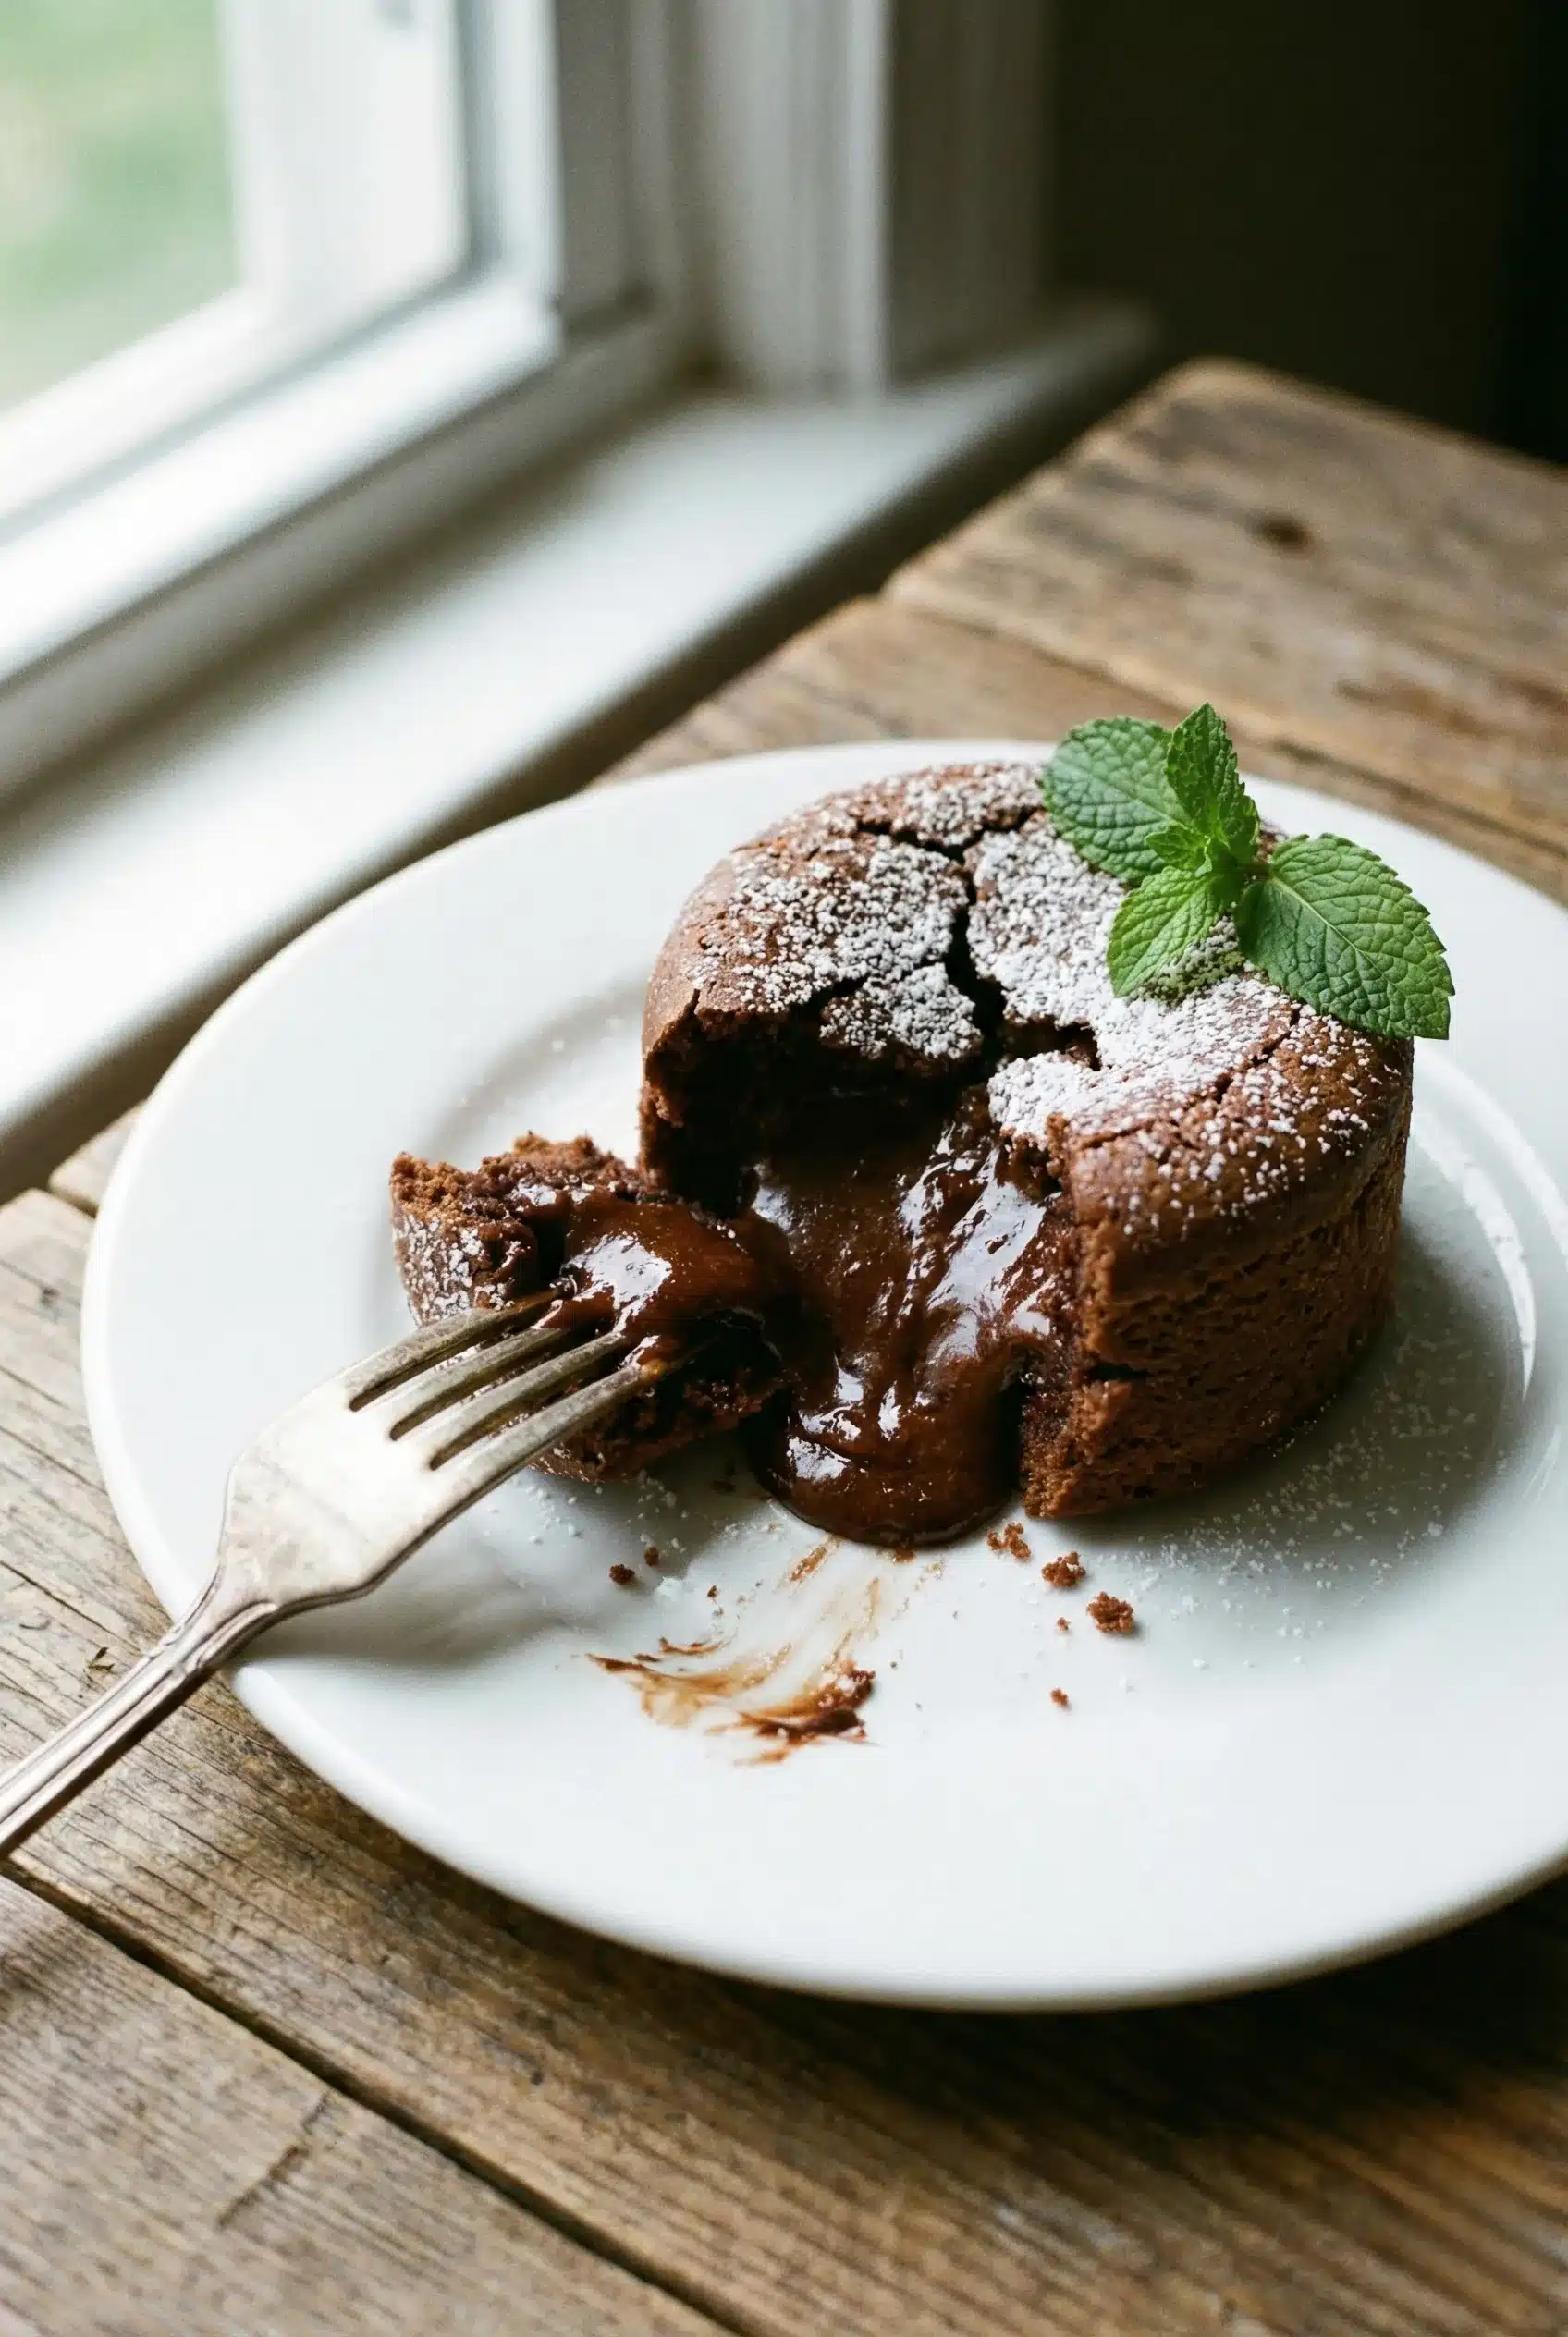
Have you ever had a dessert that made you feel like you were floating on a cloud of chocolate? Well, let me tell you about my absolute favorite indulgence: the Molten Chocolate Lava Cake! I’ve made this delightful treat more times than I can count, and it never fails to impress friends and family. Whether it’s for a cozy date night or a festive dinner party, the moment you cut into this cake and watch that gooey, rich chocolate center ooze out, you’ll know you’ve just created something extraordinary. Trust me; this dessert is a game-changer that will have everyone begging for the recipe!
Why You’ll Love This Molten Chocolate Lava Cake
- Quick and Easy: Ready in under 30 minutes, making it perfect for last-minute cravings!
- Impressive Presentation: The dramatic lava center will wow your guests and make you look like a dessert pro.
- Rich Flavor: The deep, chocolatey taste will satisfy any chocolate lover’s dreams.
- Versatile Options: Customize it with different flavor variations or toppings to suit your mood.
- Make-Ahead Convenience: Prep it in advance and bake it fresh when you’re ready to serve.
The Secret to Perfect Molten Chocolate Lava Cake
The key to achieving that luscious molten center lies in the balance of baking time and temperature. You want to bake the cake just enough so that the edges are set, while the center remains gloriously gooey. Trust me, the first time I made this, I was a bit anxious about getting it just right, but once I figured out the timing, it was smooth sailing! Here’s a tip: use high-quality chocolate for that rich flavor and silky texture. It makes a world of difference!
Rave Reviews from Friends and Followers
“This Molten Chocolate Lava Cake has turned me into a dessert snob! I can’t believe how easy it is to make something so gourmet at home!” – Sarah W.
“Every time I serve this cake, my guests are blown away. It’s my secret weapon for impressing friends!” – Mike T.
“I can’t believe I made this! It tastes like I bought it from a fancy restaurant. Absolutely delicious!” – Jessica L.
Creative Variations to Try
- Raspberry Lava: Add fresh raspberries to the center for a fruity twist that complements the chocolate perfectly.
- Nutty Delight: Mix in chopped hazelnuts or almonds for a crunchy surprise.
- Mint Chocolate Lava: Add a drop of peppermint extract to the batter for a refreshing flavor.
- Espresso Infusion: Stir in a bit of espresso powder to intensify the chocolate flavor.
- Bonus: Drizzle with caramel sauce before serving for an extra indulgent touch!
FAQs – All Your Questions Answered!
Can I make these in advance? Absolutely! You can prepare the batter ahead of time and refrigerate it. Just bake them when you’re ready to serve!
What if I don’t have ramekins? You can use muffin tins or even a cupcake pan, but be sure to adjust the baking time accordingly.
How do I know when they’re done? The edges should look set, but a slight jiggle in the center is perfect for that molten effect.
Can I substitute the chocolate? Yes! Dark chocolate, semi-sweet, or even white chocolate can work, but keep in mind the flavor will change.
How should I store leftovers? Store any leftover cakes in an airtight container in the fridge for up to 2 days.
Storage/Serving Tips
- Store in an airtight container in the fridge for up to 2 days.
- To reheat, place in the microwave for about 10-15 seconds – just enough to warm the center without overcooking.
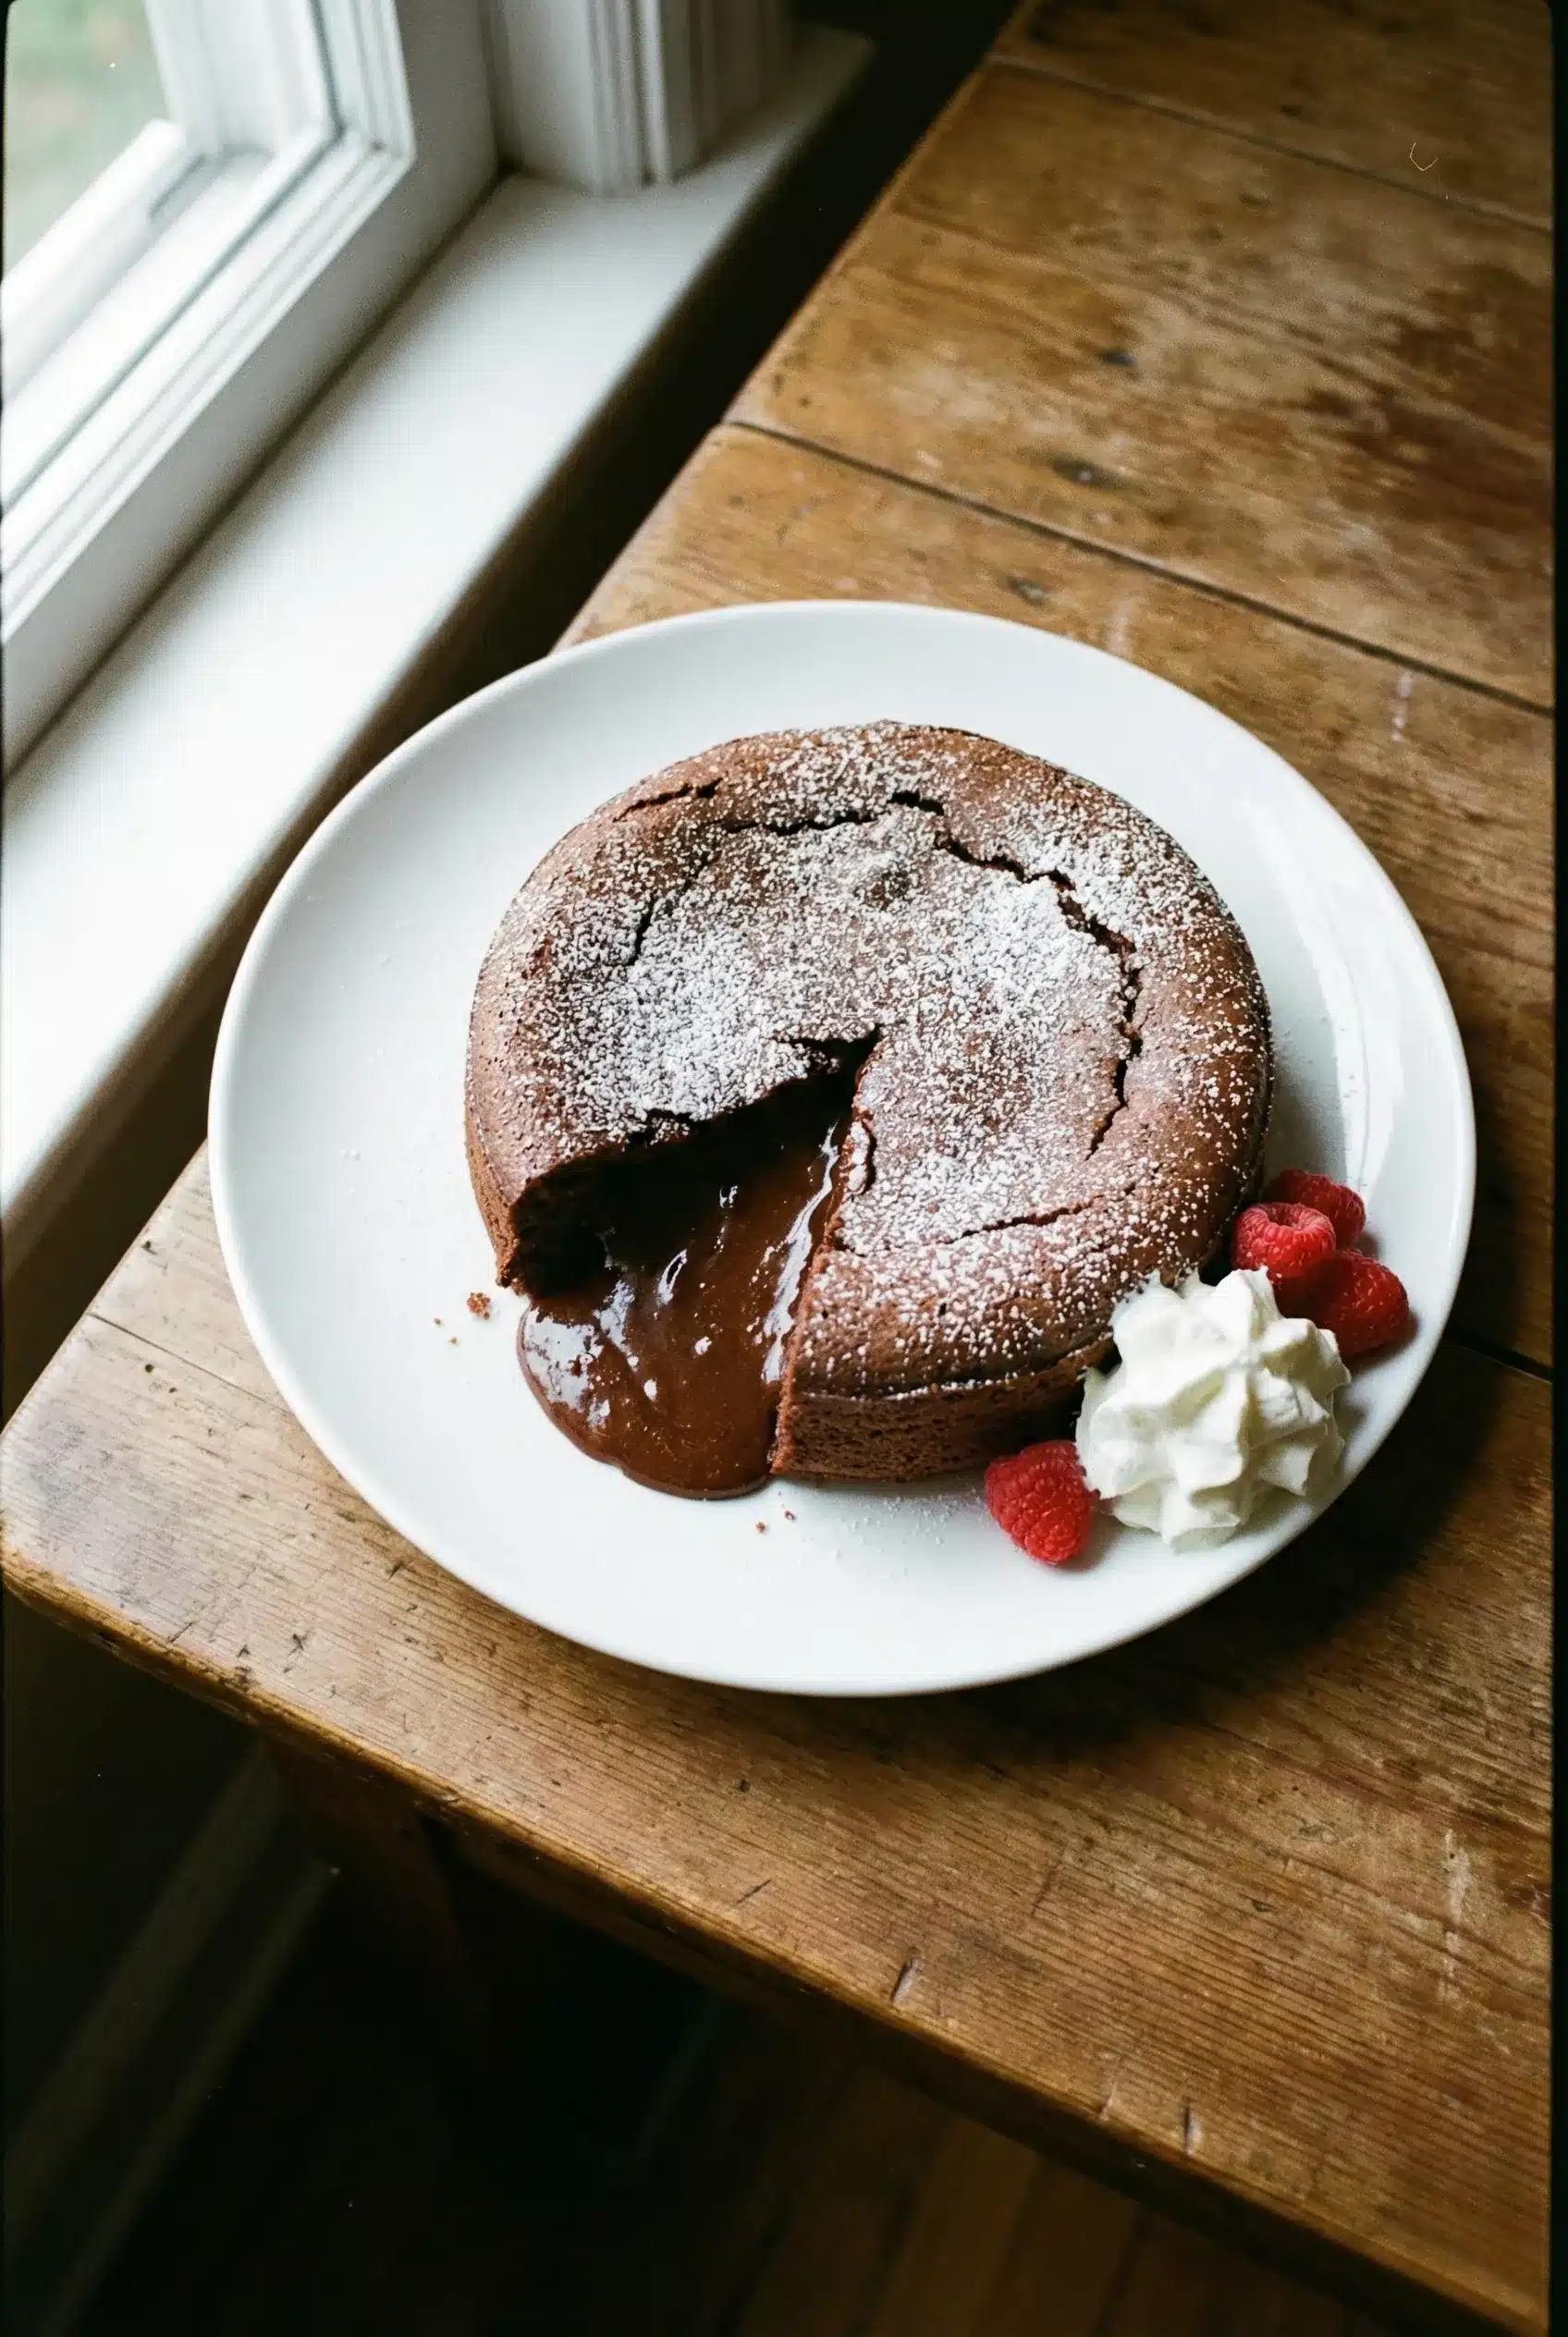
- Serve with a scoop of vanilla ice cream or a dollop of whipped cream for the ultimate experience!
Perfect Occasions for Molten Chocolate Lava Cake
- A romantic dinner date at home.
- Birthday celebrations where chocolate is a must.
- Holiday gatherings – it’s sure to be a crowd-pleaser.
- Girls’ night in, paired with a glass of wine.
- Impressing your in-laws with your baking skills.
The Complete Recipe
Now that you’re excited to make this decadent treat, here’s the complete recipe for you to follow!
Molten Chocolate Lava Cake
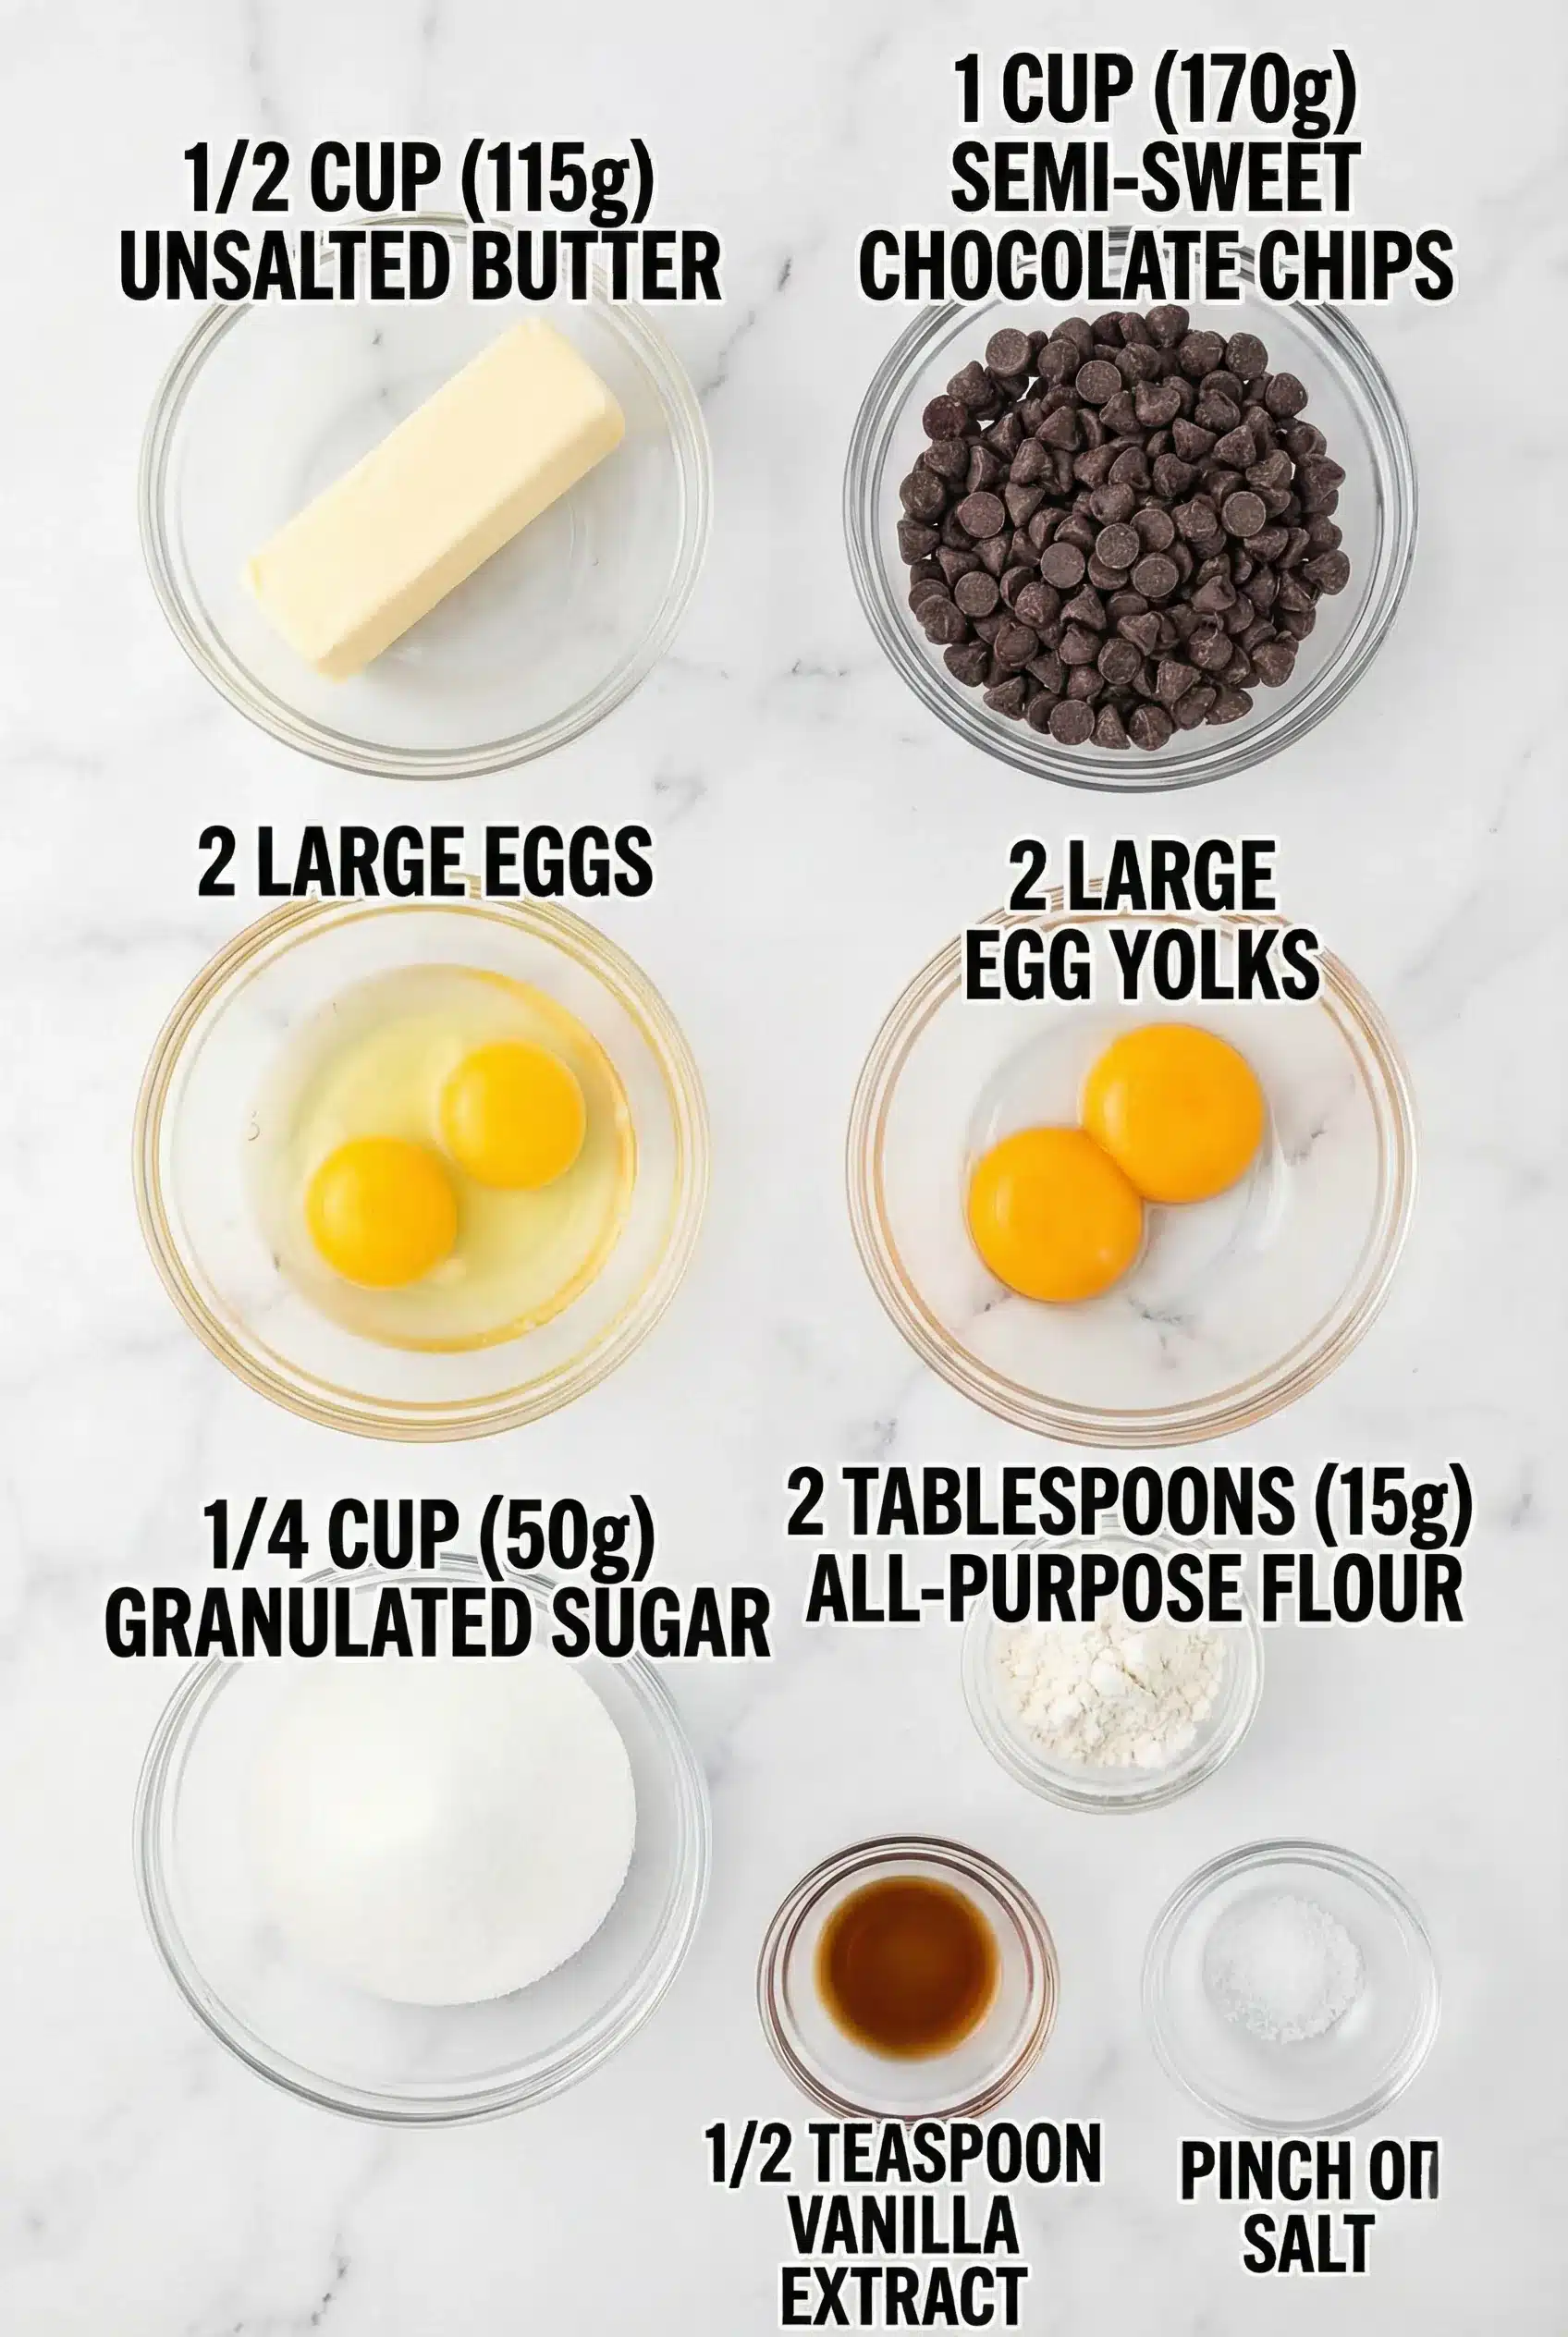
Ingredients
- 1/2 cup unsalted butter (plus extra for greasing)
- 1 cup high-quality dark chocolate (chopped)
- 2 large eggs
- 2 large egg yolks
- 1/4 cup granulated sugar
- 2 tablespoons all-purpose flour
- 1 teaspoon vanilla extract
- Pinch of salt
Tip: Make sure your ingredients are at room temperature for the best results. This ensures a smoother batter and even baking!
Optional Add-Ins: You can add a tablespoon of cocoa powder for a richer chocolate flavor or some orange zest for a citrusy touch.
Step-by-Step Instructions
Step 1: Preheat and Prepare
Preheat your oven to 425°F (220°C). Grease four ramekins with butter and dust with flour. This helps the cakes slide out easily after baking.
Step 2: Melt the Chocolate
In a microwave-safe bowl, combine the butter and chopped chocolate. Microwave in 20-second intervals, stirring in between, until completely melted and smooth. This will create the rich base for your lava cake!
Step 3: Whisk the Eggs
In a separate bowl, whisk together the eggs, egg yolks, and sugar until thick and pale. This aeration is key for a light cake texture.
Step 4: Combine Mixtures
Slowly pour the melted chocolate mixture into the egg mixture, stirring gently to combine. Then, add the flour, vanilla extract, and salt. Mix until just combined – overmixing can lead to a denser cake!
Step 5: Fill the Ramekins
Divide the batter evenly among the prepared ramekins, filling each about 3/4 full. This allows enough room for the cakes to rise while baking.
Step 6: Bake
Bake in the preheated oven for about 12-14 minutes. You want the edges to be firm, but the center should still jiggle slightly. Keep an eye on them, as every oven is a bit different!
Step 7: Serve
Let them cool for 1 minute before inverting onto plates. Serve immediately with a scoop of ice cream or a sprinkle of powdered sugar on top. Watch your guests’ faces light up when they cut into the cake!
Nutrition Info: Each serving contains approximately 300 calories, 20g fat, and 5g protein. Perfectly indulgent!
Final Thoughts
There you have it, my friends! The Molten Chocolate Lava Cake is not just a dessert; it’s an experience that brings joy and celebration to any occasion. I can’t encourage you enough to give this recipe a try. Once you do, you’ll understand why it’s become a staple in my home. So go ahead, grab those ingredients, and prepare to be amazed by the ooey-gooey deliciousness of this cake. Happy baking!
Molten Chocolate Lava Cake
-
Total Time:
24 mins -
Yield:
4 servings
Indulge in rich, gooey molten chocolate lava cake ready in under 30 minutes. Simple steps make this dessert a quick delight for any occasion.
Ingredients
- • 1/2 cup unsalted butter (plus extra for greasing)
- • 1 cup high-quality dark chocolate (chopped)
- • 2 large eggs
- • 2 large egg yolks
- • 1/4 cup granulated sugar
- • 2 tablespoons all-purpose flour
- • 1 teaspoon vanilla extract
- • Pinch of salt
Instructions
- Preheat your oven to 425°F (220°C). Grease four ramekins with butter and dust with flour.
- In a microwave-safe bowl, combine the butter and chopped chocolate. Microwave in 20-second intervals, stirring in between, until completely melted and smooth.
- In a separate bowl, whisk together the eggs, egg yolks, and sugar until thick and pale.
- Slowly pour the melted chocolate mixture into the egg mixture, stirring gently to combine. Then, add the flour, vanilla extract, and salt.
- Divide the batter evenly among the prepared ramekins, filling each about 3/4 full.
- Bake in the preheated oven for about 12-14 minutes.
- Let them cool for 1 minute before inverting onto plates. Serve immediately with a scoop of ice cream or a sprinkle of powdered sugar on top.
Notes
Storage: Store leftovers in an airtight container in the fridge for up to 3 days.
- Prep Time: 10 mins
- Cook Time: 14 mins
- Category: Dessert
- Cuisine: American
- Method: Oven