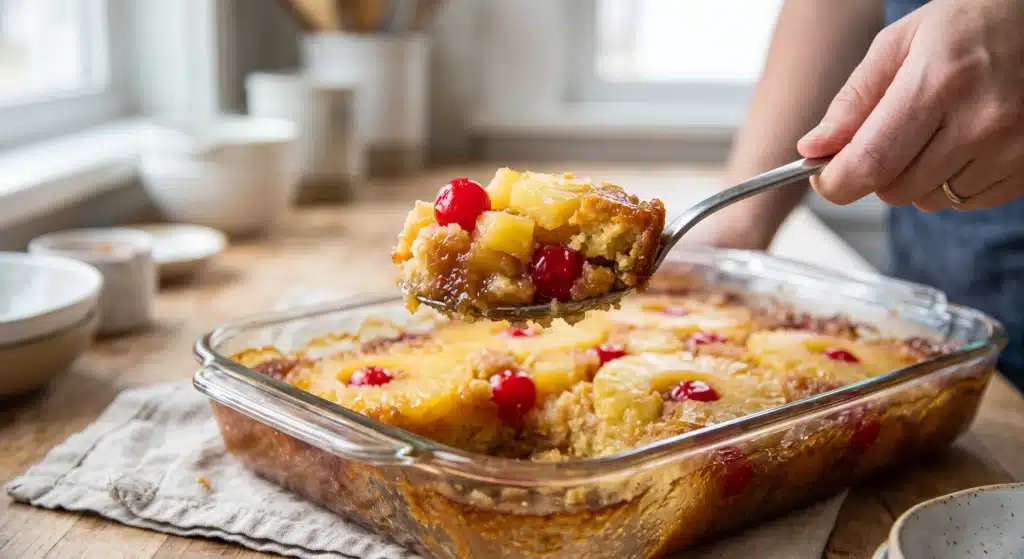
Pineapple upside down dump cake captures the comforting, nostalgic flavors of a classic baked dessert without the tedious preparation, careful arrangement, or stressful pan inversion. This straightforward recipe transforms a handful of accessible pantry staples into a warm, fruit-filled treat with a rich, caramel-like base and a buttery, tender crumb topping. The magic happens entirely in the baking dish, where sweet pineapple juices combine with brown sugar and melted butter to create a thick, bubbling syrup that bakes directly into the dry cake mix above it.
You get the signature sweet and tangy profile of traditional pineapple upside-down cake, complete with the bright, festive pops of maraschino cherries, but the process takes only a fraction of the time. The texture provides a wonderful contrast between the soft, syrupy fruit bottom and the slightly crisp, golden-brown crust. Whether you need a quick dessert for a weeknight dinner, a reliable dish for a neighborhood potluck, or a comforting weekend treat, this low-effort recipe consistently delivers excellent results. It requires minimal cleanup and uses a foolproof assembly method, making it an excellent choice for bakers of any skill level.
Why You’ll Love This Recipe
- Simple preparation: The entire dessert is assembled in the baking dish, completely eliminating the need for mixing bowls, electric beaters, or measuring out multiple dry ingredients.
- Accessible ingredients: With only five widely available items required, you can easily keep the components stocked in your pantry for whenever you want a quick baked dessert.
- Family-friendly flavor: The sweet, familiar combination of yellow cake, brown sugar, and fruit appeals to a wide range of tastes and age groups.
- Quick assembly: The active preparation time takes less than ten minutes, allowing you to get the dessert into the oven swiftly while you focus on other tasks.
- No flipping required: Traditional upside-down cakes require a stressful, carefully timed inversion that can easily tear the sponge or leave fruit stuck to the pan. This version avoids that step entirely while delivering the same flavor profile.
Ingredients You’ll Need
For the Fruit Layer
- 1 can (20 ounces) pineapple chunks, undrained
- 1/2 cup light brown sugar, loosely packed
- 1/2 cup maraschino cherries, drained and stems removed
For the Cake Topping
- 1 box (15.25 ounces) yellow cake mix
- 3/4 cup unsalted butter, melted
The success of this dessert relies entirely on the moisture provided by the canned fruit and the melted butter. Because you are not adding water, eggs, or oil to the cake mix, the undrained pineapple juice acts as the primary liquid. As the dish bakes, the fruit juice mixes with the melting brown sugar to form a rich, sweet syrup that bubbles up and hydrates the bottom of the dry cake mix. The melted butter poured over the top hydrates the upper layer, ensuring the final crust bakes up rich, tender, and golden brown.
Ingredient Notes and Substitutions
If you need to make adjustments based on what you have in your kitchen, several components of this recipe are adaptable.
If you prefer a different texture, you can substitute crushed pineapple for the pineapple chunks. Crushed pineapple will distribute the fruit flavor more evenly throughout every bite and create a slightly more jam-like base, whereas chunks provide distinct, juicy bites of fruit. Regardless of the cut, always ensure you use the fruit canned in its own juice or heavy syrup, and never drain the liquid.
While yellow cake mix provides the most traditional flavor base, a standard white cake mix, vanilla cake mix, or even a butter pecan cake mix will yield highly successful results. The moisture content remains consistent across these standard boxed mixes, though the flavor profile will shift slightly.
Light brown sugar is recommended for a balanced sweetness, but dark brown sugar works exceptionally well if you prefer a deeper, more robust molasses flavor in your caramel base.
If you only have salted butter on hand, you can use it in place of the unsalted butter. The extra salt actually works well to balance the overall sweetness of the fruit and the cake mix, preventing the dessert from tasting overly sugary.
Equipment Needed
- 9×13-inch glass or ceramic baking dish
- Measuring cups
- Small microwave-safe bowl or small saucepan
- Serving spoon
How to Make the Recipe
- Prepare the oven and baking dish: Preheat your oven to 350°F (175°C). Lightly coat the bottom and sides of a 9×13-inch baking dish with nonstick cooking spray or a small amount of butter to prevent the fruit syrup from sticking to the edges.
- Create the fruit base: Open the can of pineapple chunks and pour the entire contents, including all the juice or syrup, directly into the prepared baking dish. Use a spoon to spread the pineapple chunks into an even layer across the bottom of the pan.
- Add the sugar and cherries: Sprinkle the light brown sugar evenly over the layer of pineapple and juice. Next, distribute the drained maraschino cherries evenly throughout the dish, spacing them out so that every portion will eventually contain a few cherries.
- Add the cake mix layer: Open the box of yellow cake mix and sprinkle the dry powder evenly over the fruit, sugar, and cherry mixture. Use your hands or the back of a dry spoon to gently pat the cake mix down into a smooth, level layer. Ensure the fruit is completely covered and reach all the way to the corners of the dish. Do not stir or mix the dry powder into the wet fruit layer below it.
- Pour the melted butter: Carefully drizzle the melted butter evenly over the entire surface of the dry cake mix. Try to cover as much of the dry powder as possible. If a few small dry spots remain, they will usually hydrate during baking, but aim for the most even coverage you can achieve.
- Bake the dessert: Place the baking dish on the middle rack of the preheated oven. Bake for 40 to 45 minutes. You will know the dessert is finished when the top crust is a deep golden brown, and you can see the thick, syrupy fruit mixture bubbling actively around the edges of the pan.
- Rest before serving: Remove the baking dish from the oven and place it on a wire cooling rack. Allow the dessert to rest for 10 to 15 minutes before serving. This resting period is crucial, as it allows the bubbling fruit syrup to thicken slightly and settle, making it much easier to serve cleanly.
Tips for the Best Results
- Retain the fruit juice: The most crucial element of this dessert is the liquid from the canned pineapple. It provides the necessary hydration for the bottom half of the cake mix. If you drain the pineapple, your final dessert will turn out incredibly dry and powdery.
- Achieve even butter coverage: Take your time when pouring the melted butter. Pouring it slowly and methodically helps hydrate the maximum amount of dry cake mix. If you dump the butter in one spot, you will end up with a greasy center and dusty, unbaked edges.
- Use the correct dish: A 9×13-inch glass or ceramic baking dish distributes heat gently and evenly, which is ideal for a sugar-heavy fruit base. Dark metal pans can cause the brown sugar and fruit juices to heat too rapidly, increasing the risk of a burnt bottom before the cake topping finishes baking.
- Do not stir the pan: The defined layers are what give this dessert its satisfying texture. Stirring the dry mix into the wet ingredients will result in a dense, gummy, and unappealing texture rather than a distinct fruit base and crisp topping.
- Watch the browning: Ovens heat differently, and the butter and sugar on top of the dessert can brown quickly. If the top is reaching a deep brown color before the 40-minute mark, gently tent a piece of aluminum foil over the baking dish for the remainder of the cooking time to prevent burning.
- Slice butter as an alternative: If you struggle to pour melted butter evenly, you can cut cold butter into very thin, uniform slices and arrange them in a single, overlapping layer across the entire surface of the dry cake mix. As the oven heats, the butter will melt evenly downward.
Common Mistakes to Avoid
One of the most frequent errors is attempting to mix the ingredients together in the baking dish. While it feels unnatural to leave dry cake mix sitting on top of wet fruit without stirring, the baking process handles the hydration naturally. Stirring ruins the intended cobbler-like texture.
Another common issue is using a baking dish that is too small. Trying to fit this recipe into an 8×8-inch or 9×9-inch pan will result in a layer of dry cake mix that is too thick for the available liquid to penetrate, leaving you with a thick layer of unbaked powder in the center. Always stick to the 9×13-inch pan size.
Serving the dessert immediately after taking it out of the oven is also a mistake. The fruit base reaches boiling temperatures during baking and is dangerously hot, and the syrup needs time to cool and thicken. Slicing into it too early will result in a runny, soupy consistency on your plate.
Serving Suggestions
This warm, fruit-heavy dessert pairs exceptionally well with cool, creamy accompaniments. Serving a generous spoonful of the warm bake alongside a scoop of vanilla bean or coconut ice cream offers a wonderful contrast in both temperature and texture.
If you prefer a lighter addition, a dollop of freshly whipped heavy cream lightly sweetened with vanilla extract complements the tanginess of the pineapple. For those who enjoy extra sweetness, a light drizzle of warm caramel sauce over the individual plated portions enhances the brown sugar notes in the fruit base. This rich dessert is also highly enjoyable when served alongside a cup of dark roast coffee or a robust black tea, as the bitterness of the beverage balances the sweetness of the fruit and cake.
Storage and Reheating
Allow any leftover dessert to cool completely to room temperature before attempting to store it. Once cooled, cover the baking dish tightly with plastic wrap or transfer the leftovers into an airtight storage container. Store it in the refrigerator for up to four days. Keeping it refrigerated ensures the fruit base remains safe to consume.
Freezing this specific dessert is not recommended. The freezing and thawing process breaks down the cellular structure of the pineapple and the cherries, resulting in a mushy texture. Additionally, the cake topping will absorb too much moisture during the thawing process, becoming soggy and losing its appealing, slightly crisp texture.
To reheat leftovers, scoop an individual portion onto a microwave-safe plate and warm it in the microwave for 30 to 45 seconds until heated through. If you wish to restore some of the crispness to the topping, place a portion in an oven-safe dish and warm it in a 325°F (165°C) oven for about 10 minutes.
Frequently Asked Questions
Can I use fresh pineapple instead of canned?
Using fresh pineapple requires significant modifications and is generally not recommended for this specific method. Canned pineapple provides the exact volume of juice needed to hydrate the dry cake mix. Fresh pineapple does not release enough liquid fast enough during baking, which will result in a powdery, unbaked topping. If you must use fresh fruit, you will need to manually add water, pineapple juice, or a simple syrup to the dish to compensate.
Why are there dry powdery spots on top of my cake?
Dry spots occur when the melted butter does not reach certain areas of the dry cake mix. This is a normal occurrence in this style of baking and does not ruin the dessert. If you notice large dry patches halfway through the baking time, you can lightly mist those specific areas with a little bit of water or melted butter using a spray bottle or a pastry brush.
Can I make this dessert ahead of time?
It is best to bake this dish right before you plan to serve it. If you assemble the layers and leave the dish sitting on the counter or in the refrigerator before baking, the dry cake mix will begin absorbing the fruit juice unevenly, leading to a gummy and dense texture once baked.
Can I double the recipe?
Yes, but you cannot bake a doubled recipe in a single 9×13-inch pan. The layers will be too thick to bake properly. If you need to double the yield, you must use two separate 9×13-inch baking dishes and bake them side-by-side in the oven, ensuring there is enough space for hot air to circulate around both pans.
How do I know when it is fully cooked?
Look at the edges of the baking dish. The fruit syrup should be bubbling actively up the sides. The center of the cake topping should look set and dry, and the entire surface should be an even, deep golden brown.
Final Thoughts
Baking a comforting, fruit-filled dessert does not have to involve hours of careful measuring and multiple dirty mixing bowls. By utilizing smart pantry staples and a straightforward layering technique, you can easily produce a satisfying treat that looks and tastes thoughtfully prepared. Keep these five simple ingredients stocked in your kitchen, and you will always be prepared to make this wonderful pineapple upside down dump cake whenever a craving hits. Give this reliable method a try the next time you need a quick dessert, and enjoy the rich, caramelized fruit flavors with practically zero effort.