Oh my goodness, let me tell you about the time I whipped up a batch of Crispy Chocolate Chip Waffles that took my breakfast game to a whole new level! Picture this: the smell of melting chocolate wafting through the kitchen, the sound of the waffle iron sizzling, and that first bite—an explosion of crispy goodness followed by gooey chocolate. I’ve made these waffles so many times, and they never fail to impress my family and friends. Trust me, this recipe is a total crowd-pleaser and an absolute game-changer for breakfast or brunch.
Why You’ll Love This Crispy Chocolate Chip Waffles
- Incredibly Easy: You don’t need to be a master chef to whip these up. Just mix, pour, and enjoy!
- Decadent Flavor: The combination of crispy exterior and melted chocolate chips offers a taste that’s simply irresistible.
- Perfectly Versatile: Serve them with syrup, whipped cream, or fresh fruit—there’s no wrong way to enjoy these waffles!
- Make-Ahead Convenience: You can easily prepare the batter ahead of time, making mornings a breeze.
- Visually Stunning: The golden-brown waffles, speckled with chocolate chips, are sure to impress anyone you serve.
The Secret to Perfect Crispy Chocolate Chip Waffles
Here’s the scoop: the secret to achieving that delightful crispy texture lies in a couple of key ingredients and techniques. First and foremost, using a blend of both baking powder and baking soda gives these waffles the perfect rise. This ensures they are light and airy on the inside while maintaining that crispy exterior we all crave. Additionally, letting your batter rest for about 10 minutes before cooking allows the flour to fully hydrate, resulting in a wonderfully tender texture. Seriously, if you follow these tips, you’ll feel like a waffle pro in no time!
Rave Reviews from Friends and Followers
“These waffles are a breakfast miracle! The texture is perfect, and the chocolate chips are just the right amount of melty. My kids can’t get enough!” – Sarah M.
“I made these for brunch with friends, and everyone was blown away! They were crispy on the outside and fluffy on the inside. A must-try!” – Jason L.
“I never thought homemade waffles could be this easy! The flavor was incredible, and they looked beautiful on the plate. Definitely making these again!” – Emily R.
Creative Variations to Try
- Banana Chocolate Chip: Add mashed ripe bananas to the batter for a fruity twist.
- Nutty Surprise: Fold in some chopped nuts like walnuts or pecans for added crunch.
- Spiced Delight: Sprinkle in a pinch of cinnamon or nutmeg for a warming flavor.
- Berry Bliss: Toss in a handful of fresh berries along with the chocolate chips.
- Bonus: Drizzle melted peanut butter over the waffles for a decadent touch that will blow your mind!
FAQs – All Your Questions Answered!
Can I use whole wheat flour instead of all-purpose flour?
Absolutely! Whole wheat flour can add a nutty flavor and extra fiber. Just keep in mind that it may alter the texture slightly.
How do I store leftover waffles?
Allow the waffles to cool completely, then store them in an airtight container in the fridge for up to 3 days, or freeze them for up to 2 months.
Can I make the batter ahead of time?
Yes! You can prepare the batter the night before and store it in the fridge. Just give it a gentle stir before using.
What if my waffles turn out soggy?
Ensure your waffle iron is preheated properly, and avoid overloading it with batter. A crispy exterior comes from the right amount of heat and batter.
Storage/Serving Tips
- Store leftover waffles in the fridge for up to 3 days in an airtight container.
- For longer storage, freeze waffles in a single layer on a baking sheet, then transfer to a freezer bag once frozen.
- Reheat in a toaster or oven for that crispy texture again!
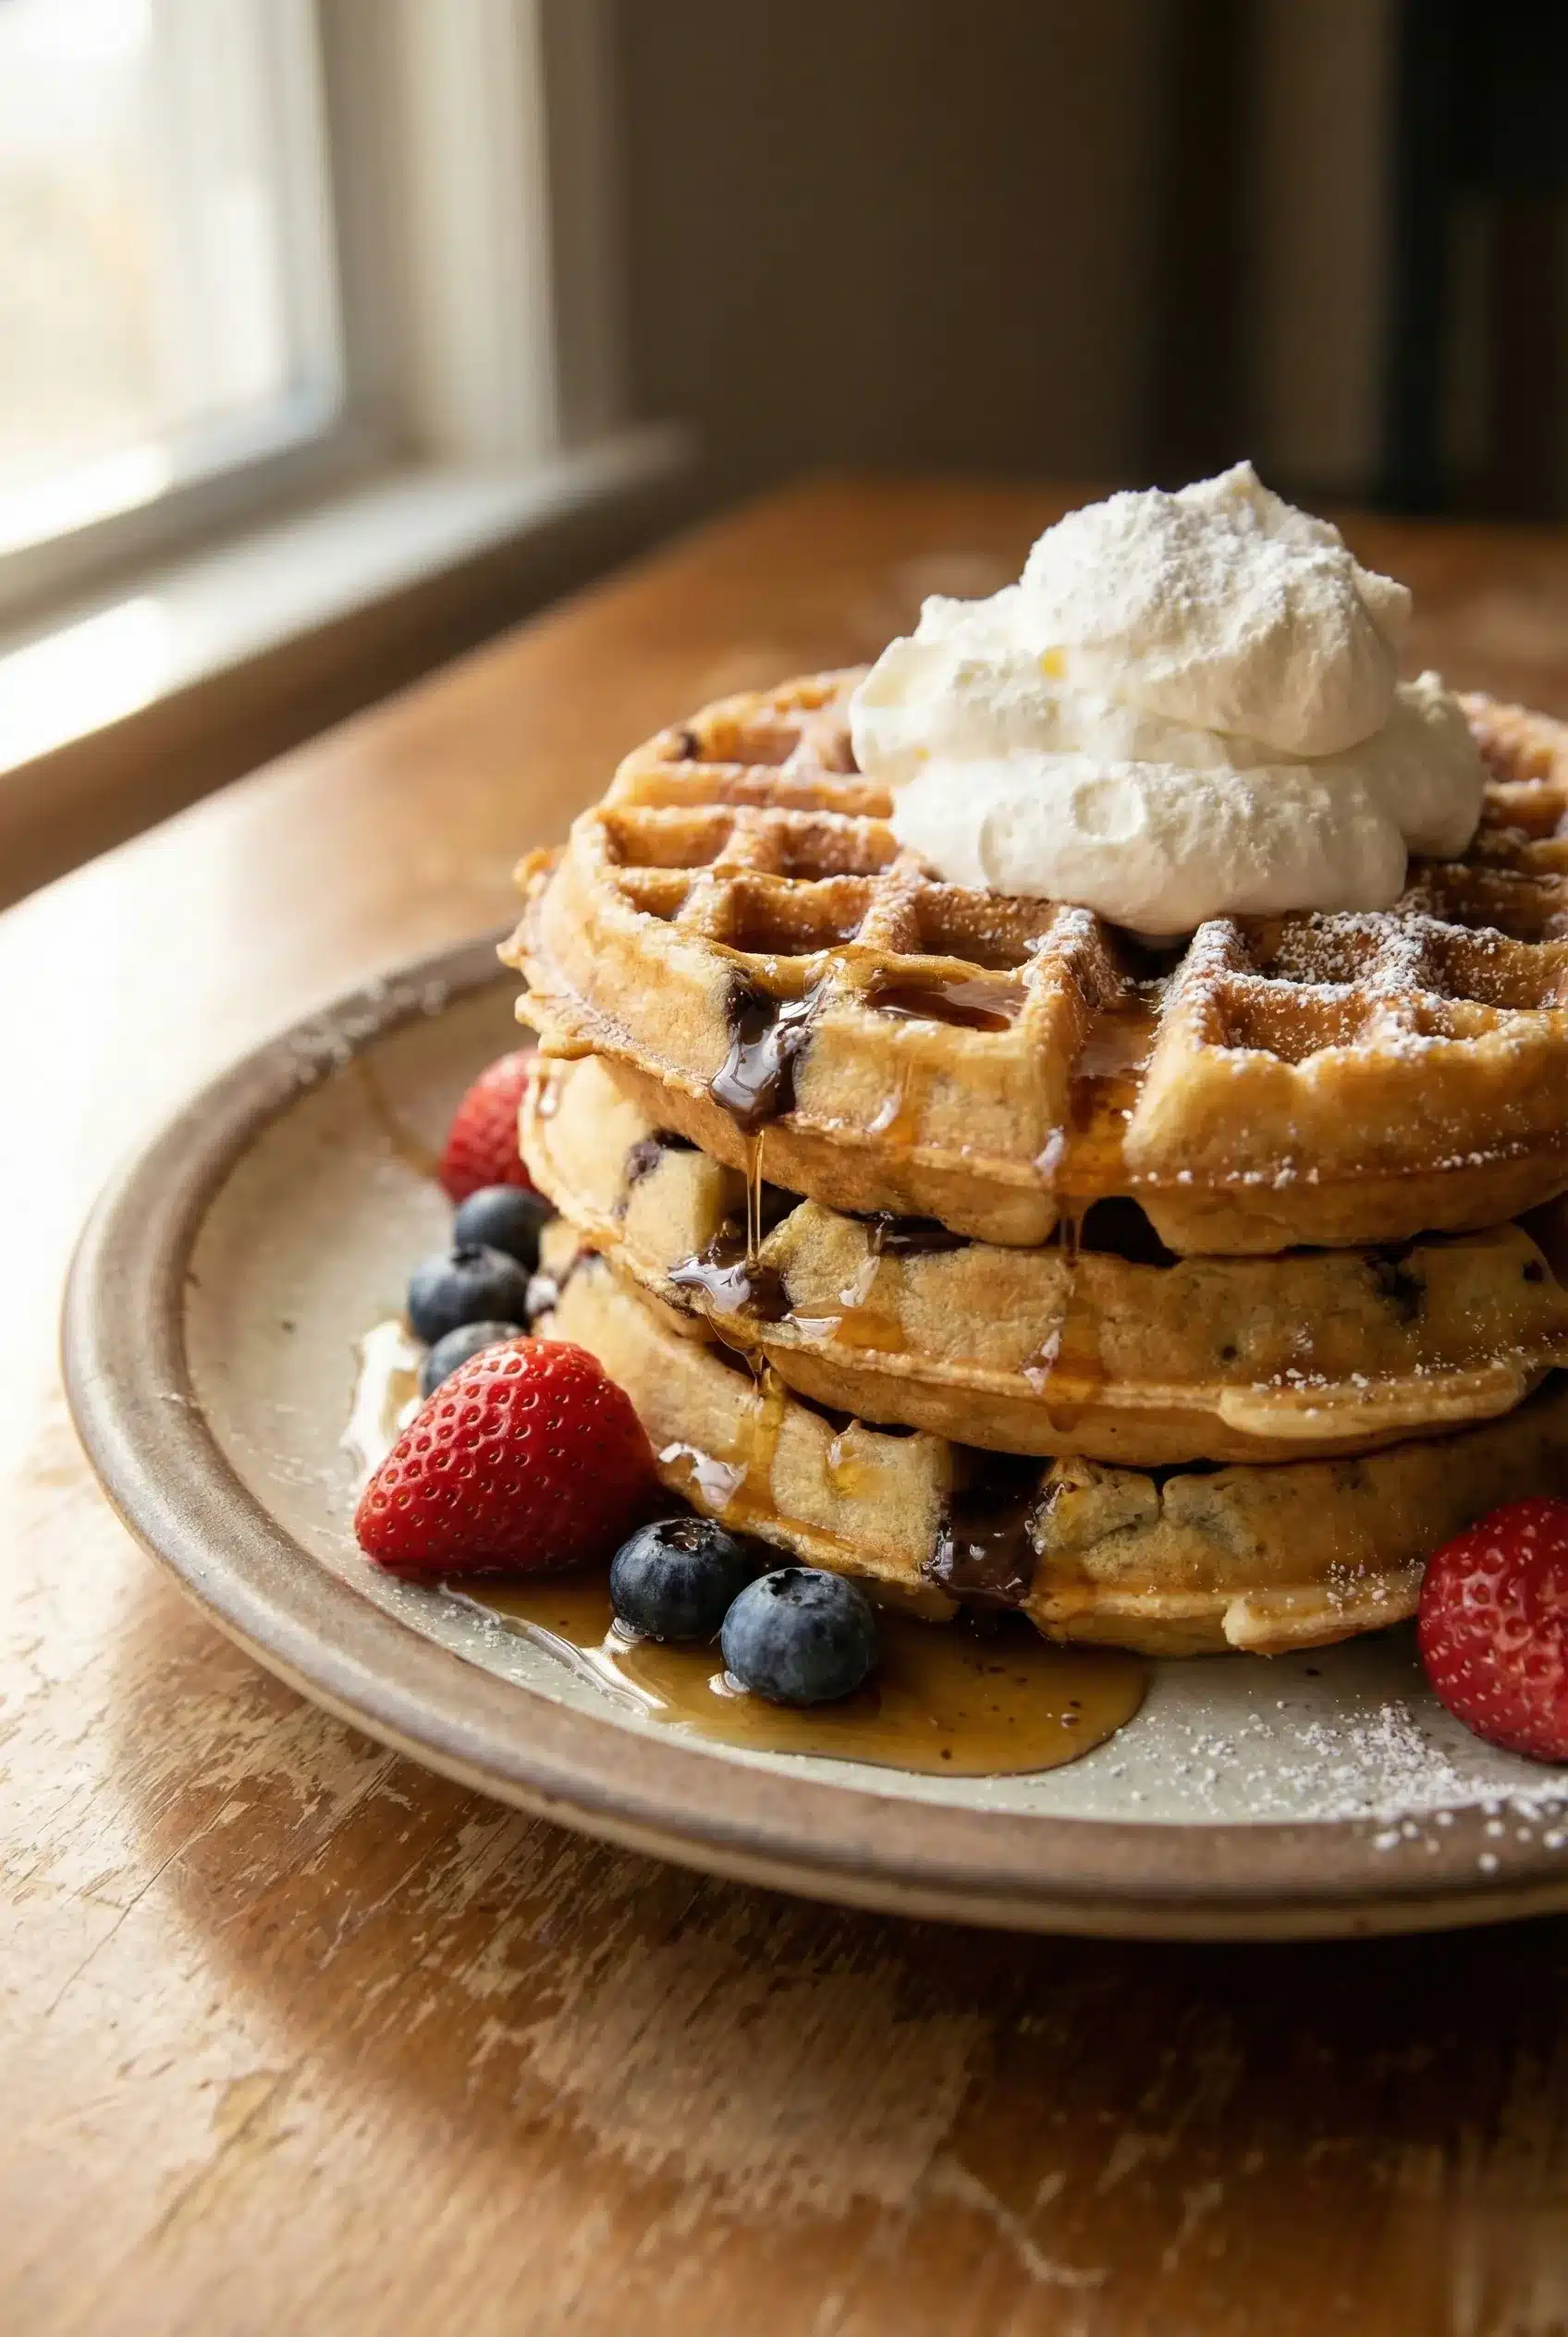
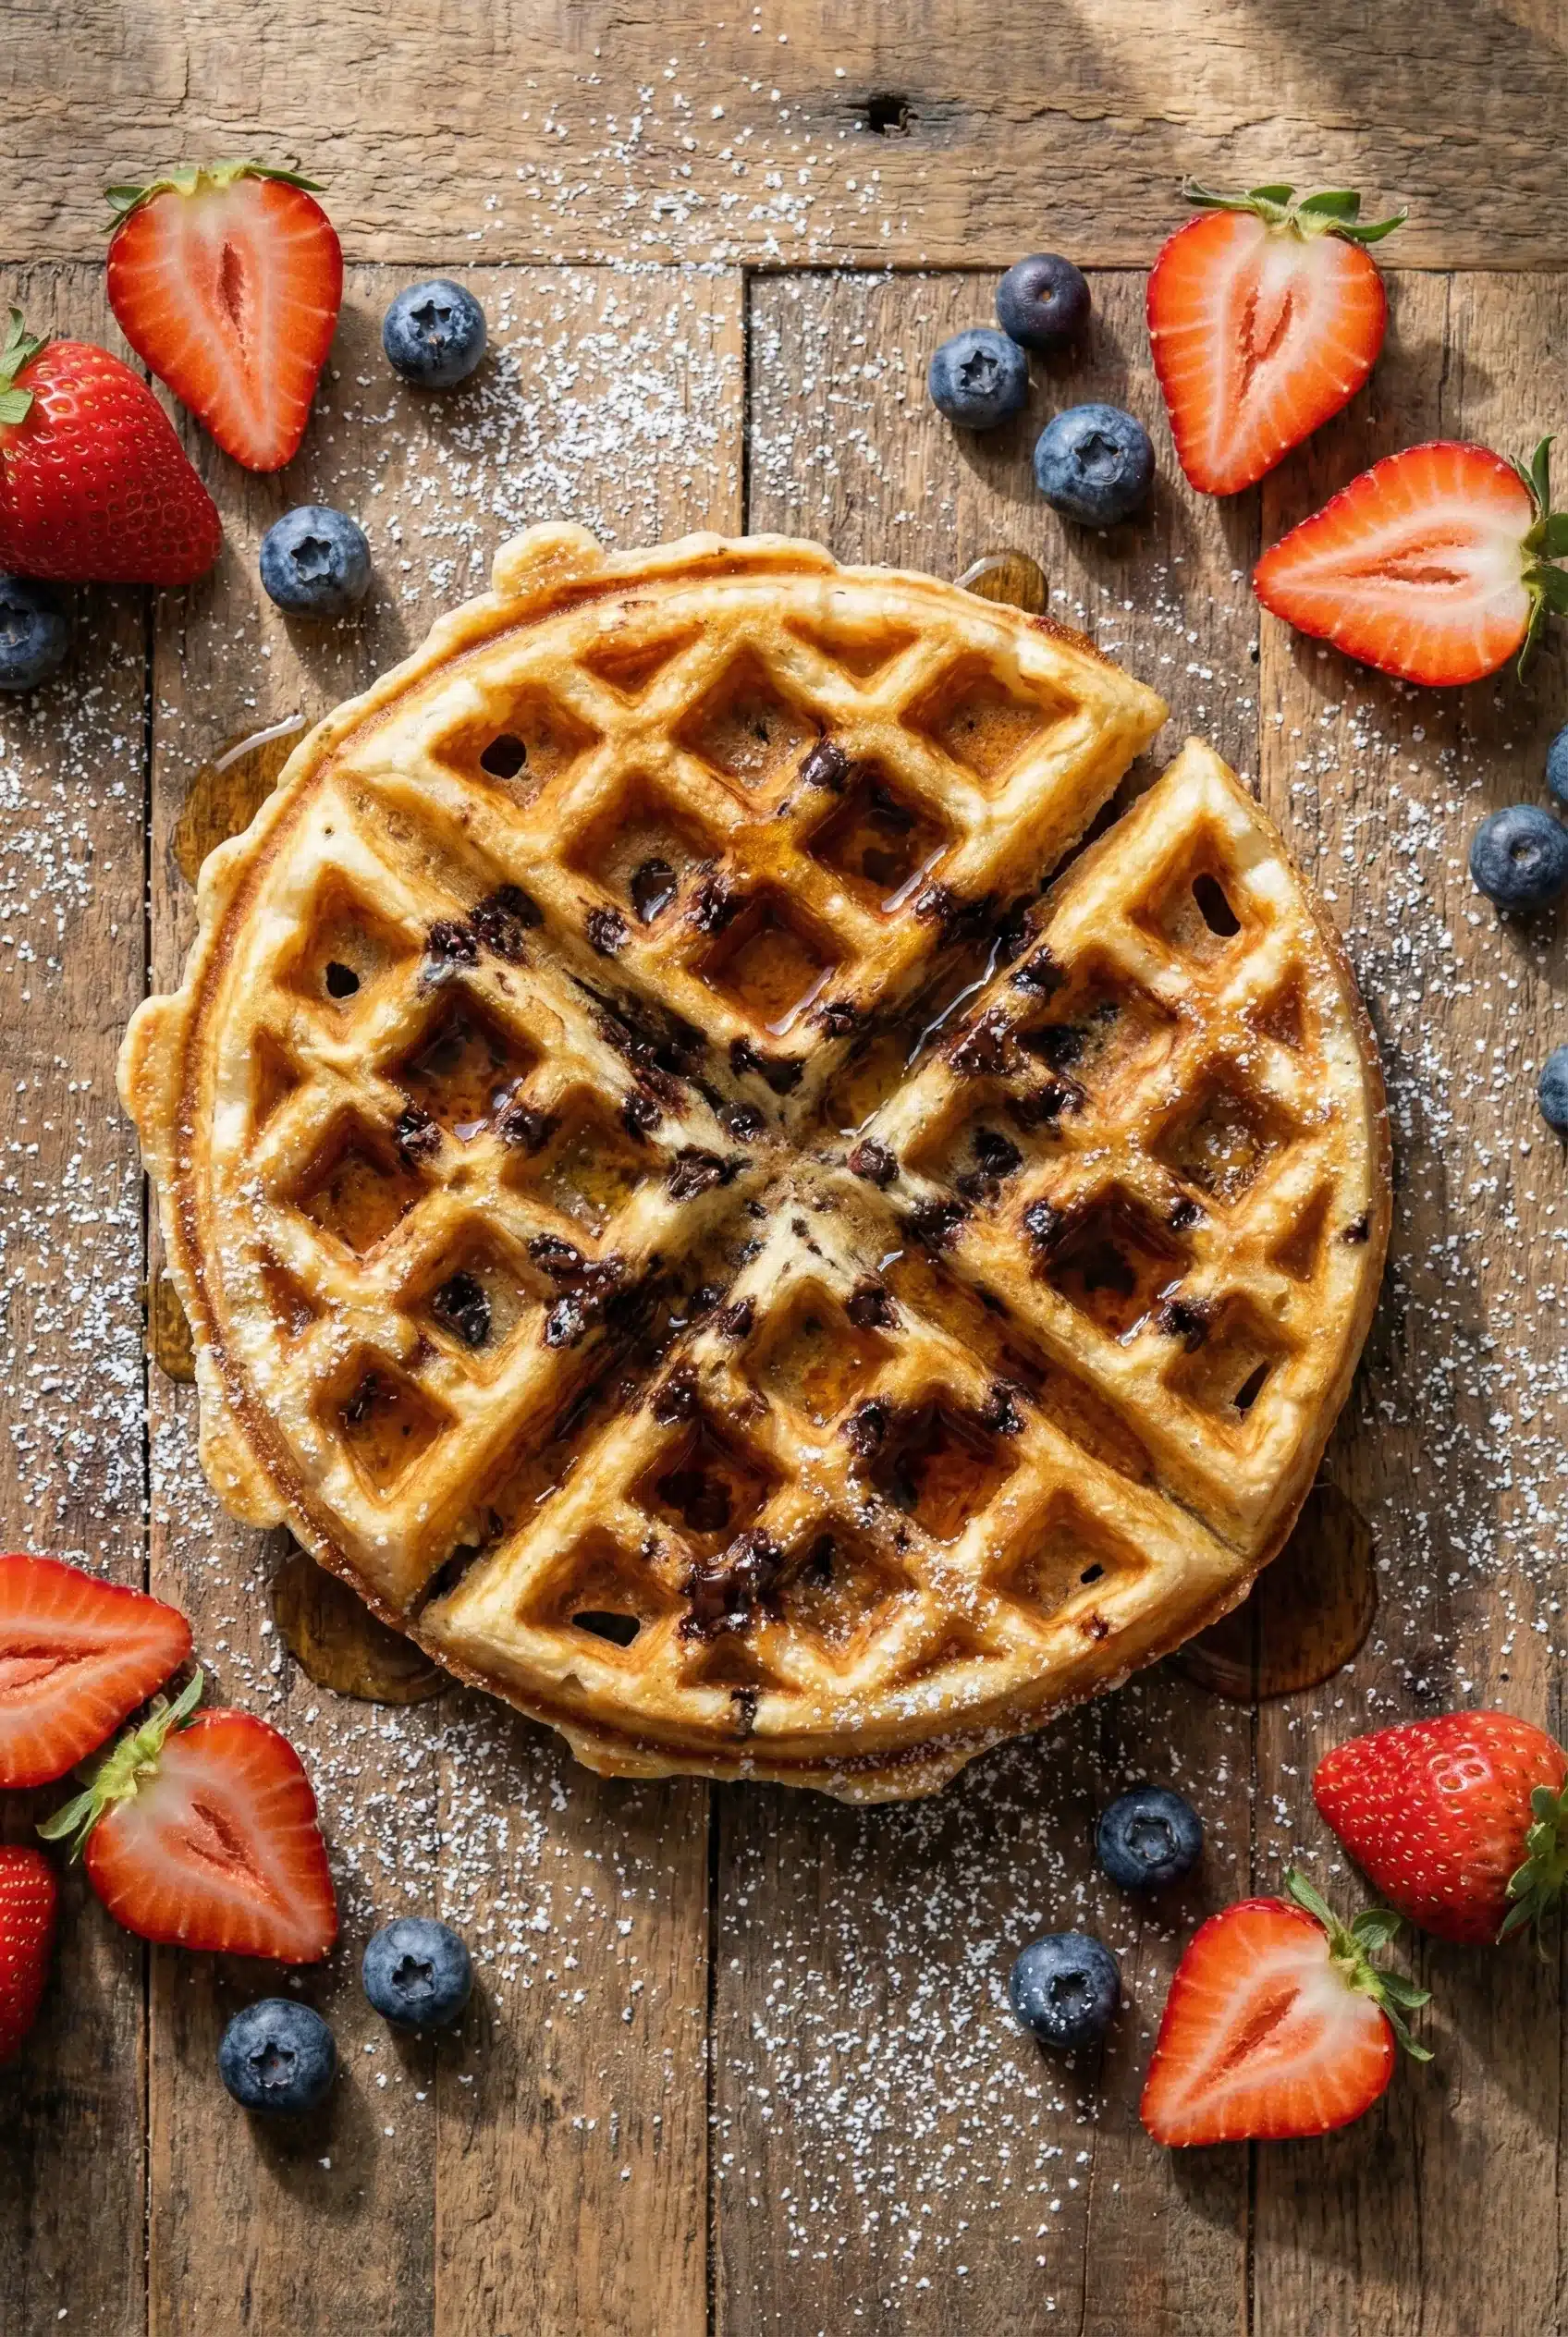
- Serve warm with maple syrup, whipped cream, or a dusting of powdered sugar for a delightful presentation.
Perfect Occasions for Crispy Chocolate Chip Waffles
- Weekend brunch with friends.
- Kids’ sleepover breakfast.
- Special holiday mornings like Christmas or Easter.
- Celebrating a birthday with a sweet treat.
- Lazy Sunday mornings when you just want to indulge.
The Complete Recipe
Thank you for joining me on this delicious journey! Now, let’s get to the recipe so you can start making these Crispy Chocolate Chip Waffles in your own kitchen.
Crispy Chocolate Chip Waffles
Ingredients
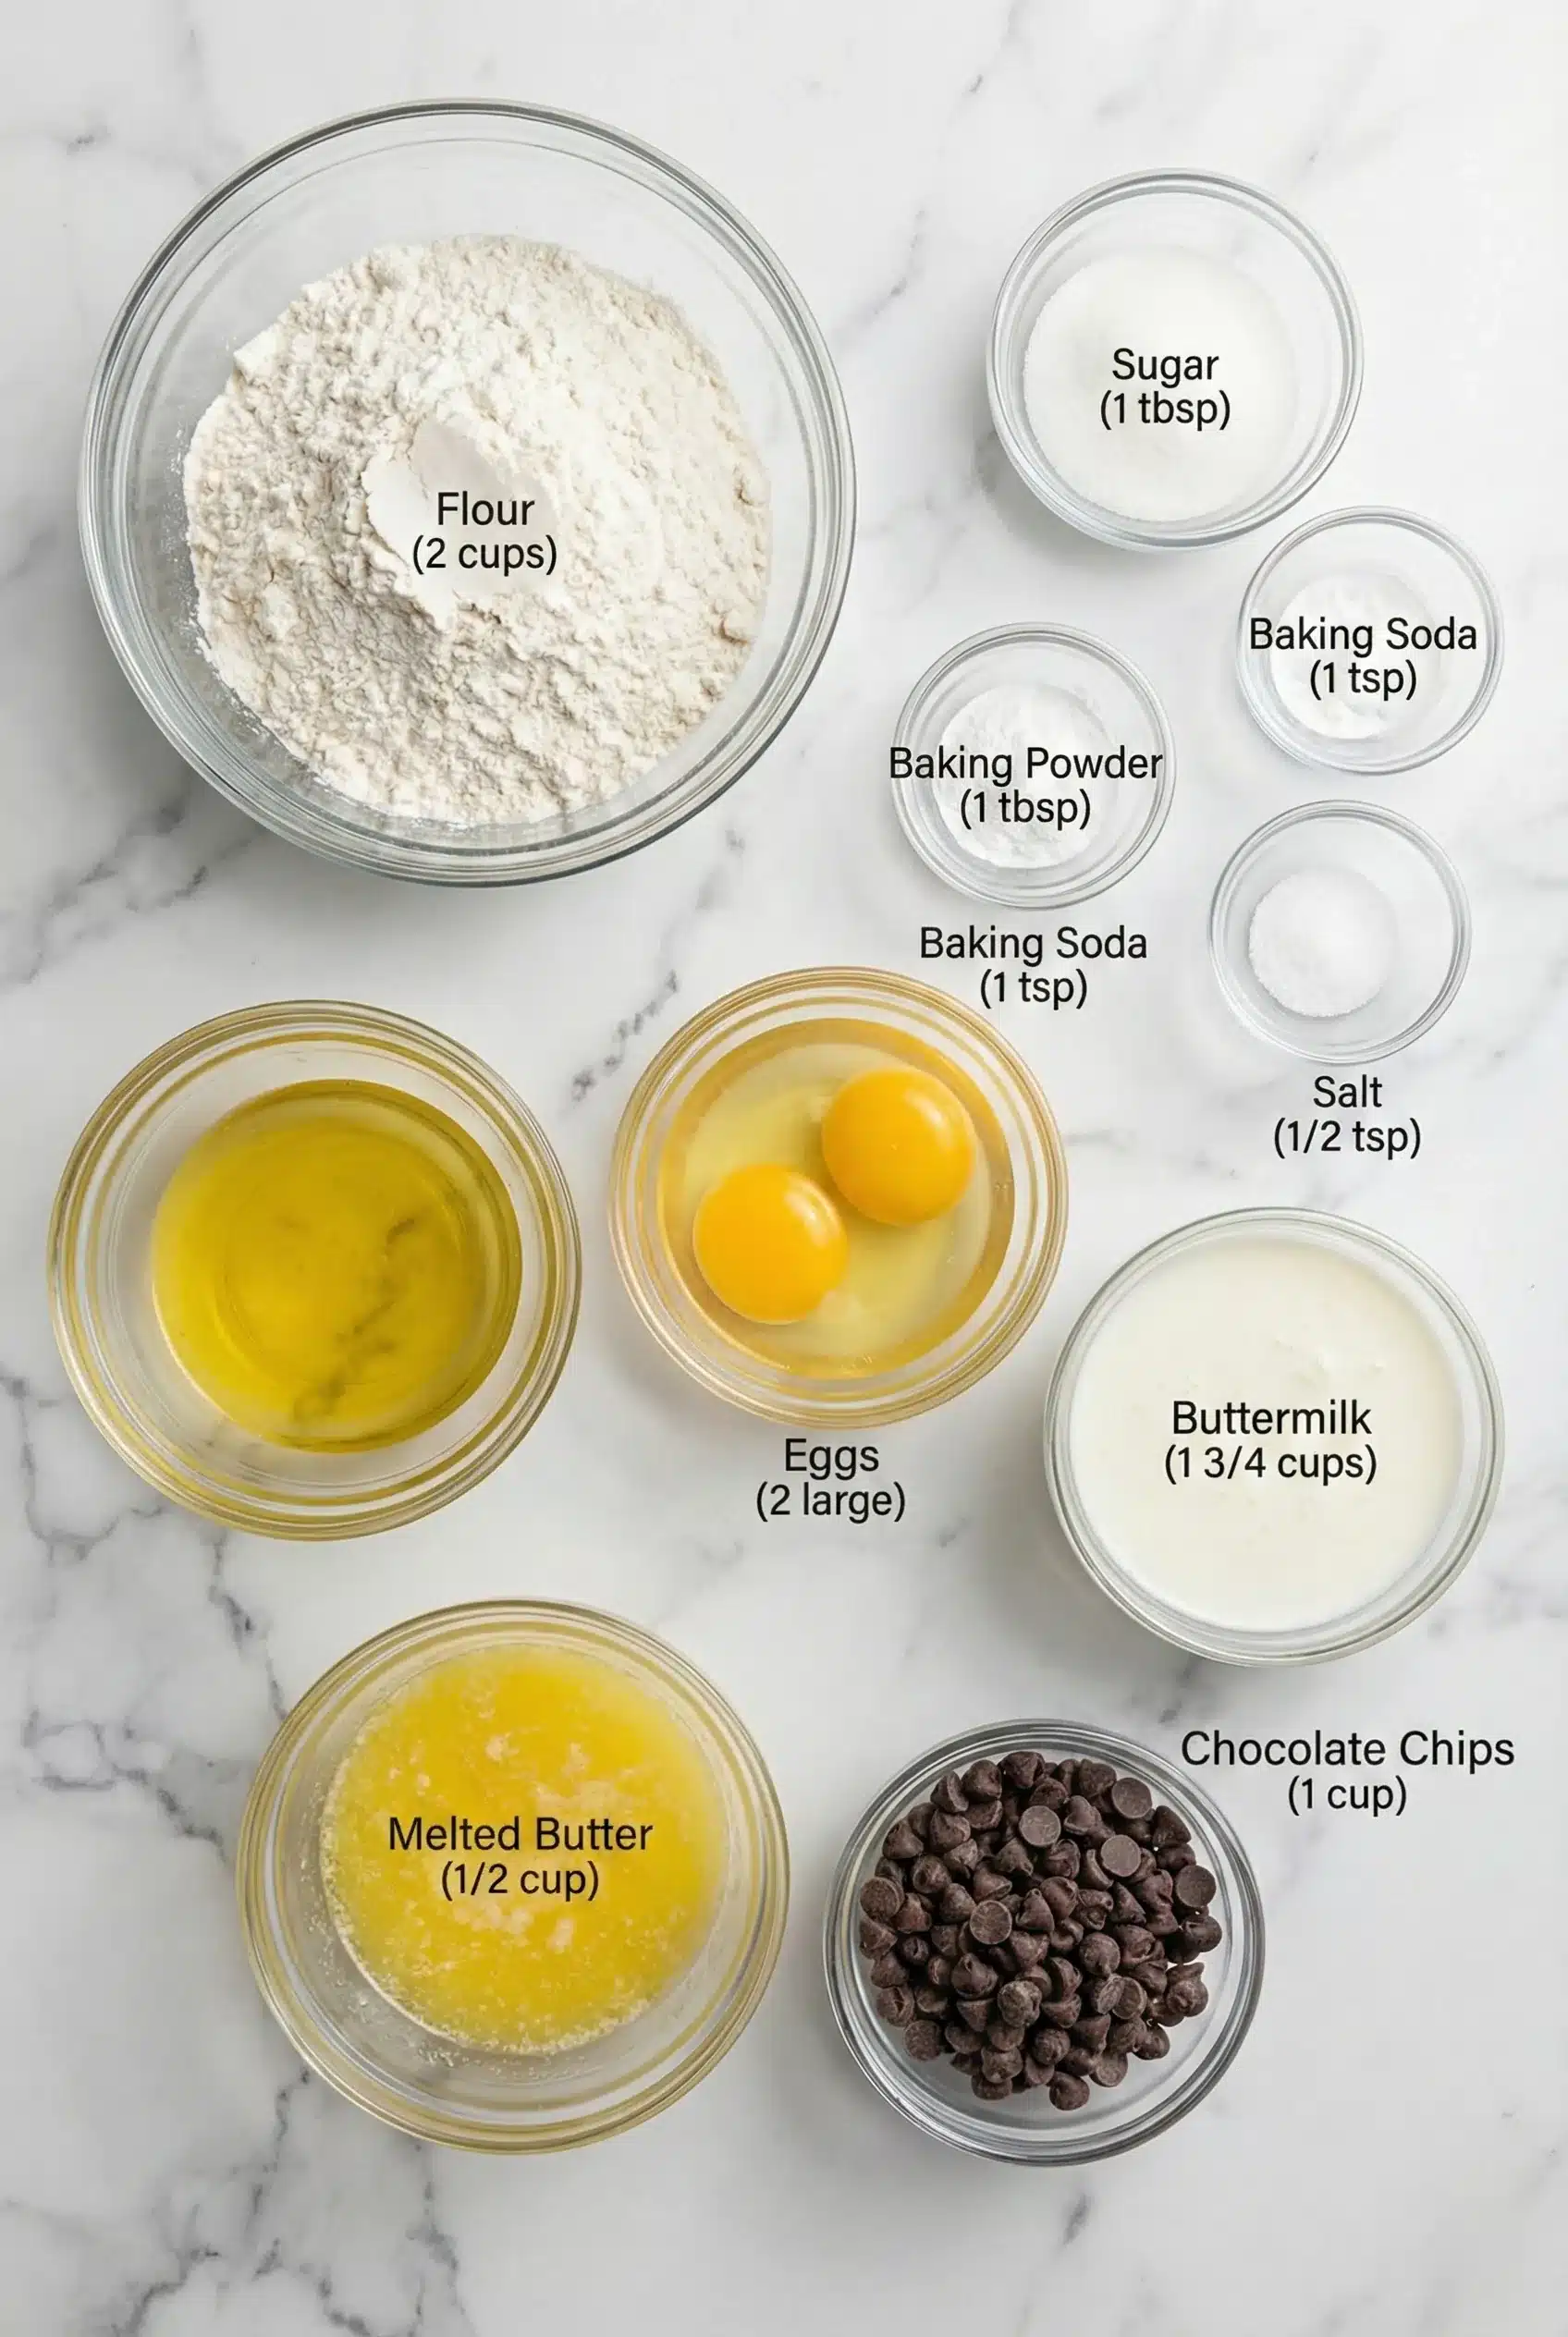
- 2 cups all-purpose flour
- 2 tablespoons granulated sugar
- 1 tablespoon baking powder
- 1 teaspoon baking soda
- 1/2 teaspoon salt
- 2 large eggs
- 1 3/4 cups buttermilk
- 1/2 cup vegetable oil
- 1 teaspoon vanilla extract
- 1 cup chocolate chips
Tip: For a richer flavor, consider using dark chocolate chips or a mix of milk and dark chocolate.
Step-by-Step Instructions
Step 1: Preheat Your Waffle Iron
Start by preheating your waffle iron according to the manufacturer’s instructions. This is crucial to getting that perfect crispy texture right from the start!
Step 2: Mix Dry Ingredients
In a large bowl, whisk together the flour, sugar, baking powder, baking soda, and salt. This step ensures that your leavening agents are evenly distributed throughout the batter.
Step 3: Combine Wet Ingredients
In another bowl, beat the eggs and then mix in the buttermilk, vegetable oil, and vanilla extract. Make sure everything is well combined for the best flavor.
Step 4: Combine Wet and Dry Ingredients
Pour the wet mixture into the dry ingredients and stir gently until just combined. It’s okay if there are a few lumps—overmixing can lead to tough waffles!
Step 5: Add Chocolate Chips
Gently fold in the chocolate chips, ensuring they are evenly distributed throughout the batter. You want every bite to have that delectable chocolatey goodness!
Step 6: Cook the Waffles
Lightly grease your waffle iron with cooking spray or a brush of oil. Pour the recommended amount of batter onto the hot iron, close it, and cook according to your machine’s instructions until golden brown and crispy.
Step 7: Serve and Enjoy
Once cooked, remove the waffles carefully and serve immediately while they’re still warm and crispy! Top with your favorite syrup, whipped cream, or fresh fruit.
Nutrition Info: Each serving of these waffles is approximately 350 calories, with 12g of fat, 50g of carbs, and 7g of protein.
Final Thoughts
I can’t emphasize enough how special these Crispy Chocolate Chip Waffles are. They’re not just a breakfast; they’re an experience! The combination of crispy and chocolatey is simply unbeatable. So, what are
Crispy Chocolate Chip Waffles
-
Total Time:
35 mins -
Yield:
4 servings
Discover the secret to irresistibly crispy chocolate chip waffles, featuring buttermilk and a hint of vanilla for a delightful breakfast treat.
Ingredients
- • 2 cups all-purpose flour
- • 2 tablespoons granulated sugar
- • 1 tablespoon baking powder
- • 1 teaspoon baking soda
- • 1/2 teaspoon salt
- • 2 large eggs
- • 1 3/4 cups buttermilk
- • 1/2 cup vegetable oil
- • 1 teaspoon vanilla extract
- • 1 cup chocolate chips
Instructions
- Preheat Your Waffle Iron according to the manufacturer’s instructions.
- In a large bowl, whisk together the flour, sugar, baking powder, baking soda, and salt.
- In another bowl, beat the eggs and then mix in the buttermilk, vegetable oil, and vanilla extract.
- Pour the wet mixture into the dry ingredients and stir gently until just combined.
- Gently fold in the chocolate chips.
- Lightly grease your waffle iron and pour the recommended amount of batter onto the hot iron.
- Cook according to your machine’s instructions until golden brown and crispy.
- Remove the waffles carefully and serve immediately while they’re still warm and crispy.
Notes
Storage: Store leftovers in an airtight container in the fridge for up to 3 days.
- Prep Time: 15 mins
- Cook Time: 20 mins
- Category: Breakfast
- Cuisine: American
- Method: Oven